
User Guide
Every screen of Custom Signup Forms, step by step: build your form, put it live, review applications, send customer emails and run a different form on each storefront.
Getting around
Open the app from your BigCommerce control panel under Apps → My Apps → Custom Signup Forms. Everything lives in the top bar:
- Dashboard - totals, shortcuts and the latest requests.
- Form Builder - your saved forms and the editor.
- Requests - every application, with an amber badge counting the ones waiting for you.
- Email - the customer email templates and your sending (SMTP) settings.
- Storefronts - which form each storefront serves (multi-storefront, Pro and Enterprise).
- The gear icon opens Settings; Help links to the SMTP and headless integration guides.
When multi-storefront is on, a storefront switcher also appears next to the logo. See Multi-storefront.
The dashboard
The dashboard shows how your signup flow is doing and how many applications are waiting for a decision.
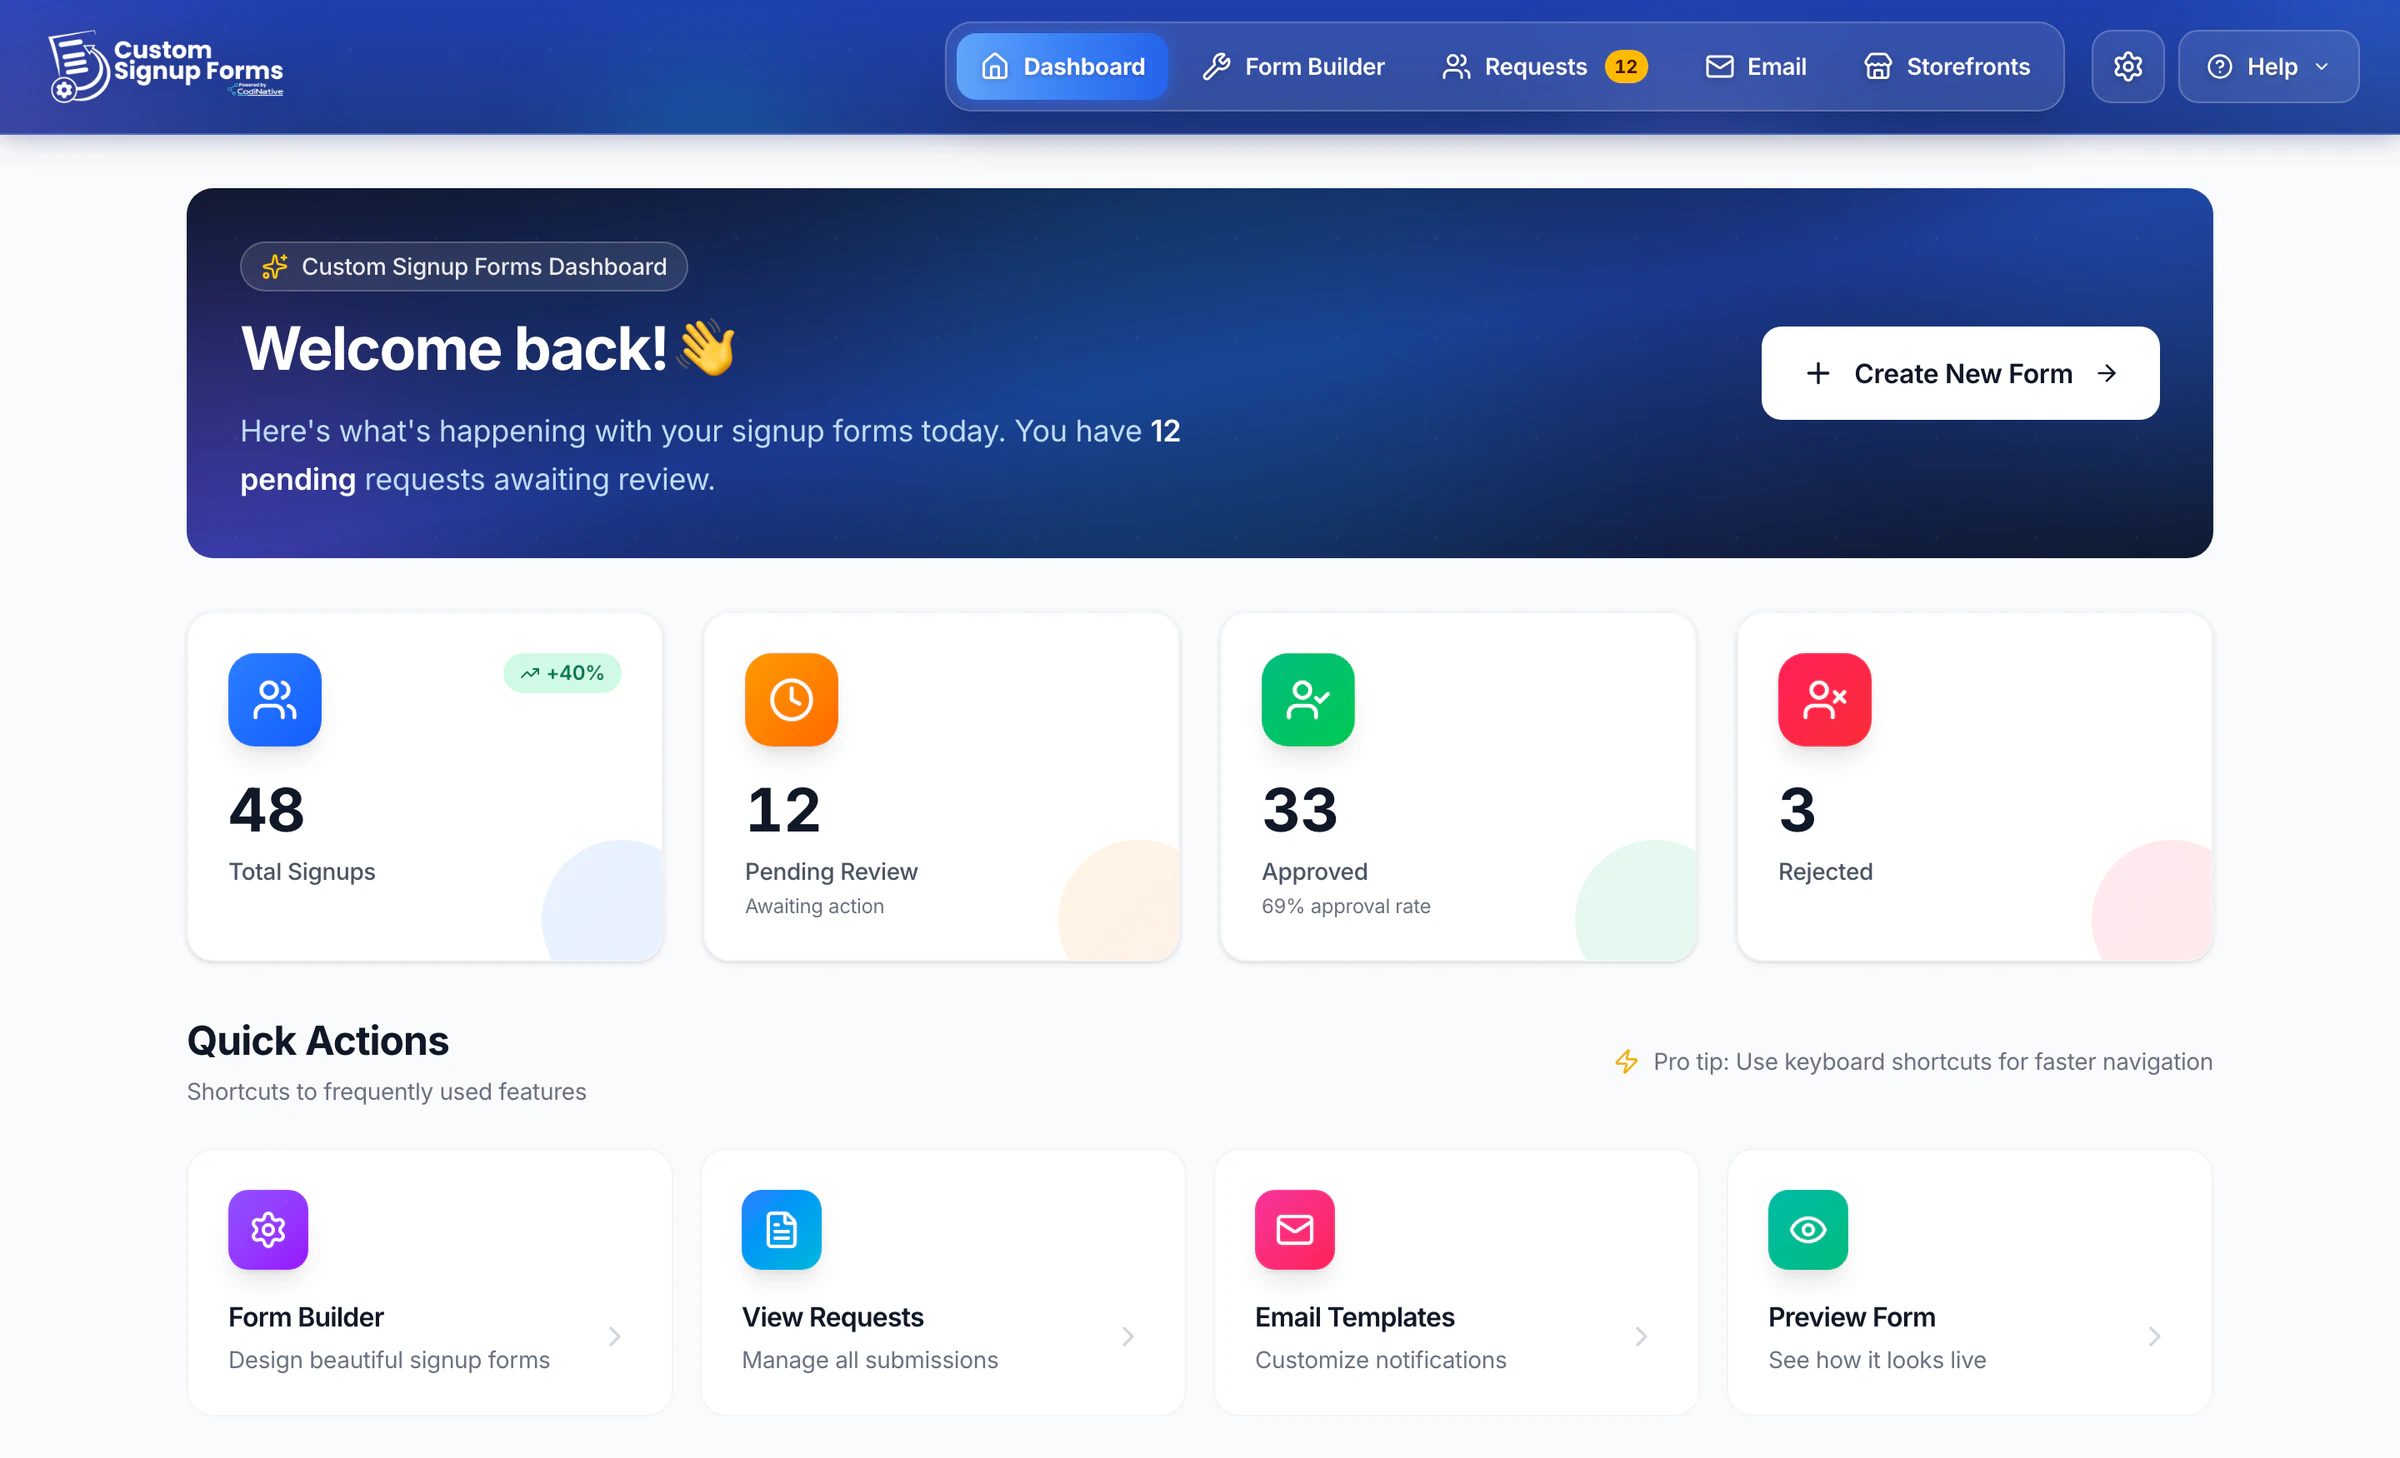
- Four totals - Total Signups (with the change against the previous 7 days), Pending Review, Approved (with your approval rate) and Rejected. Click a total to open those requests.
- Quick Actions - Form Builder, View Requests, Email Templates and Preview Form, a full-page preview of your live form.
- Recent Signup Requests - the five latest applications, each with a View button.
- Create New Form - opens the builder to start a new form.
During a free trial a banner counts the days left. On the Free plan a meter shows how many of your 100 monthly signups you have used.
Saved forms
Every form you save is kept in a library, so you can prepare a new form while another one is live.
In the app: Form Builder → Forms
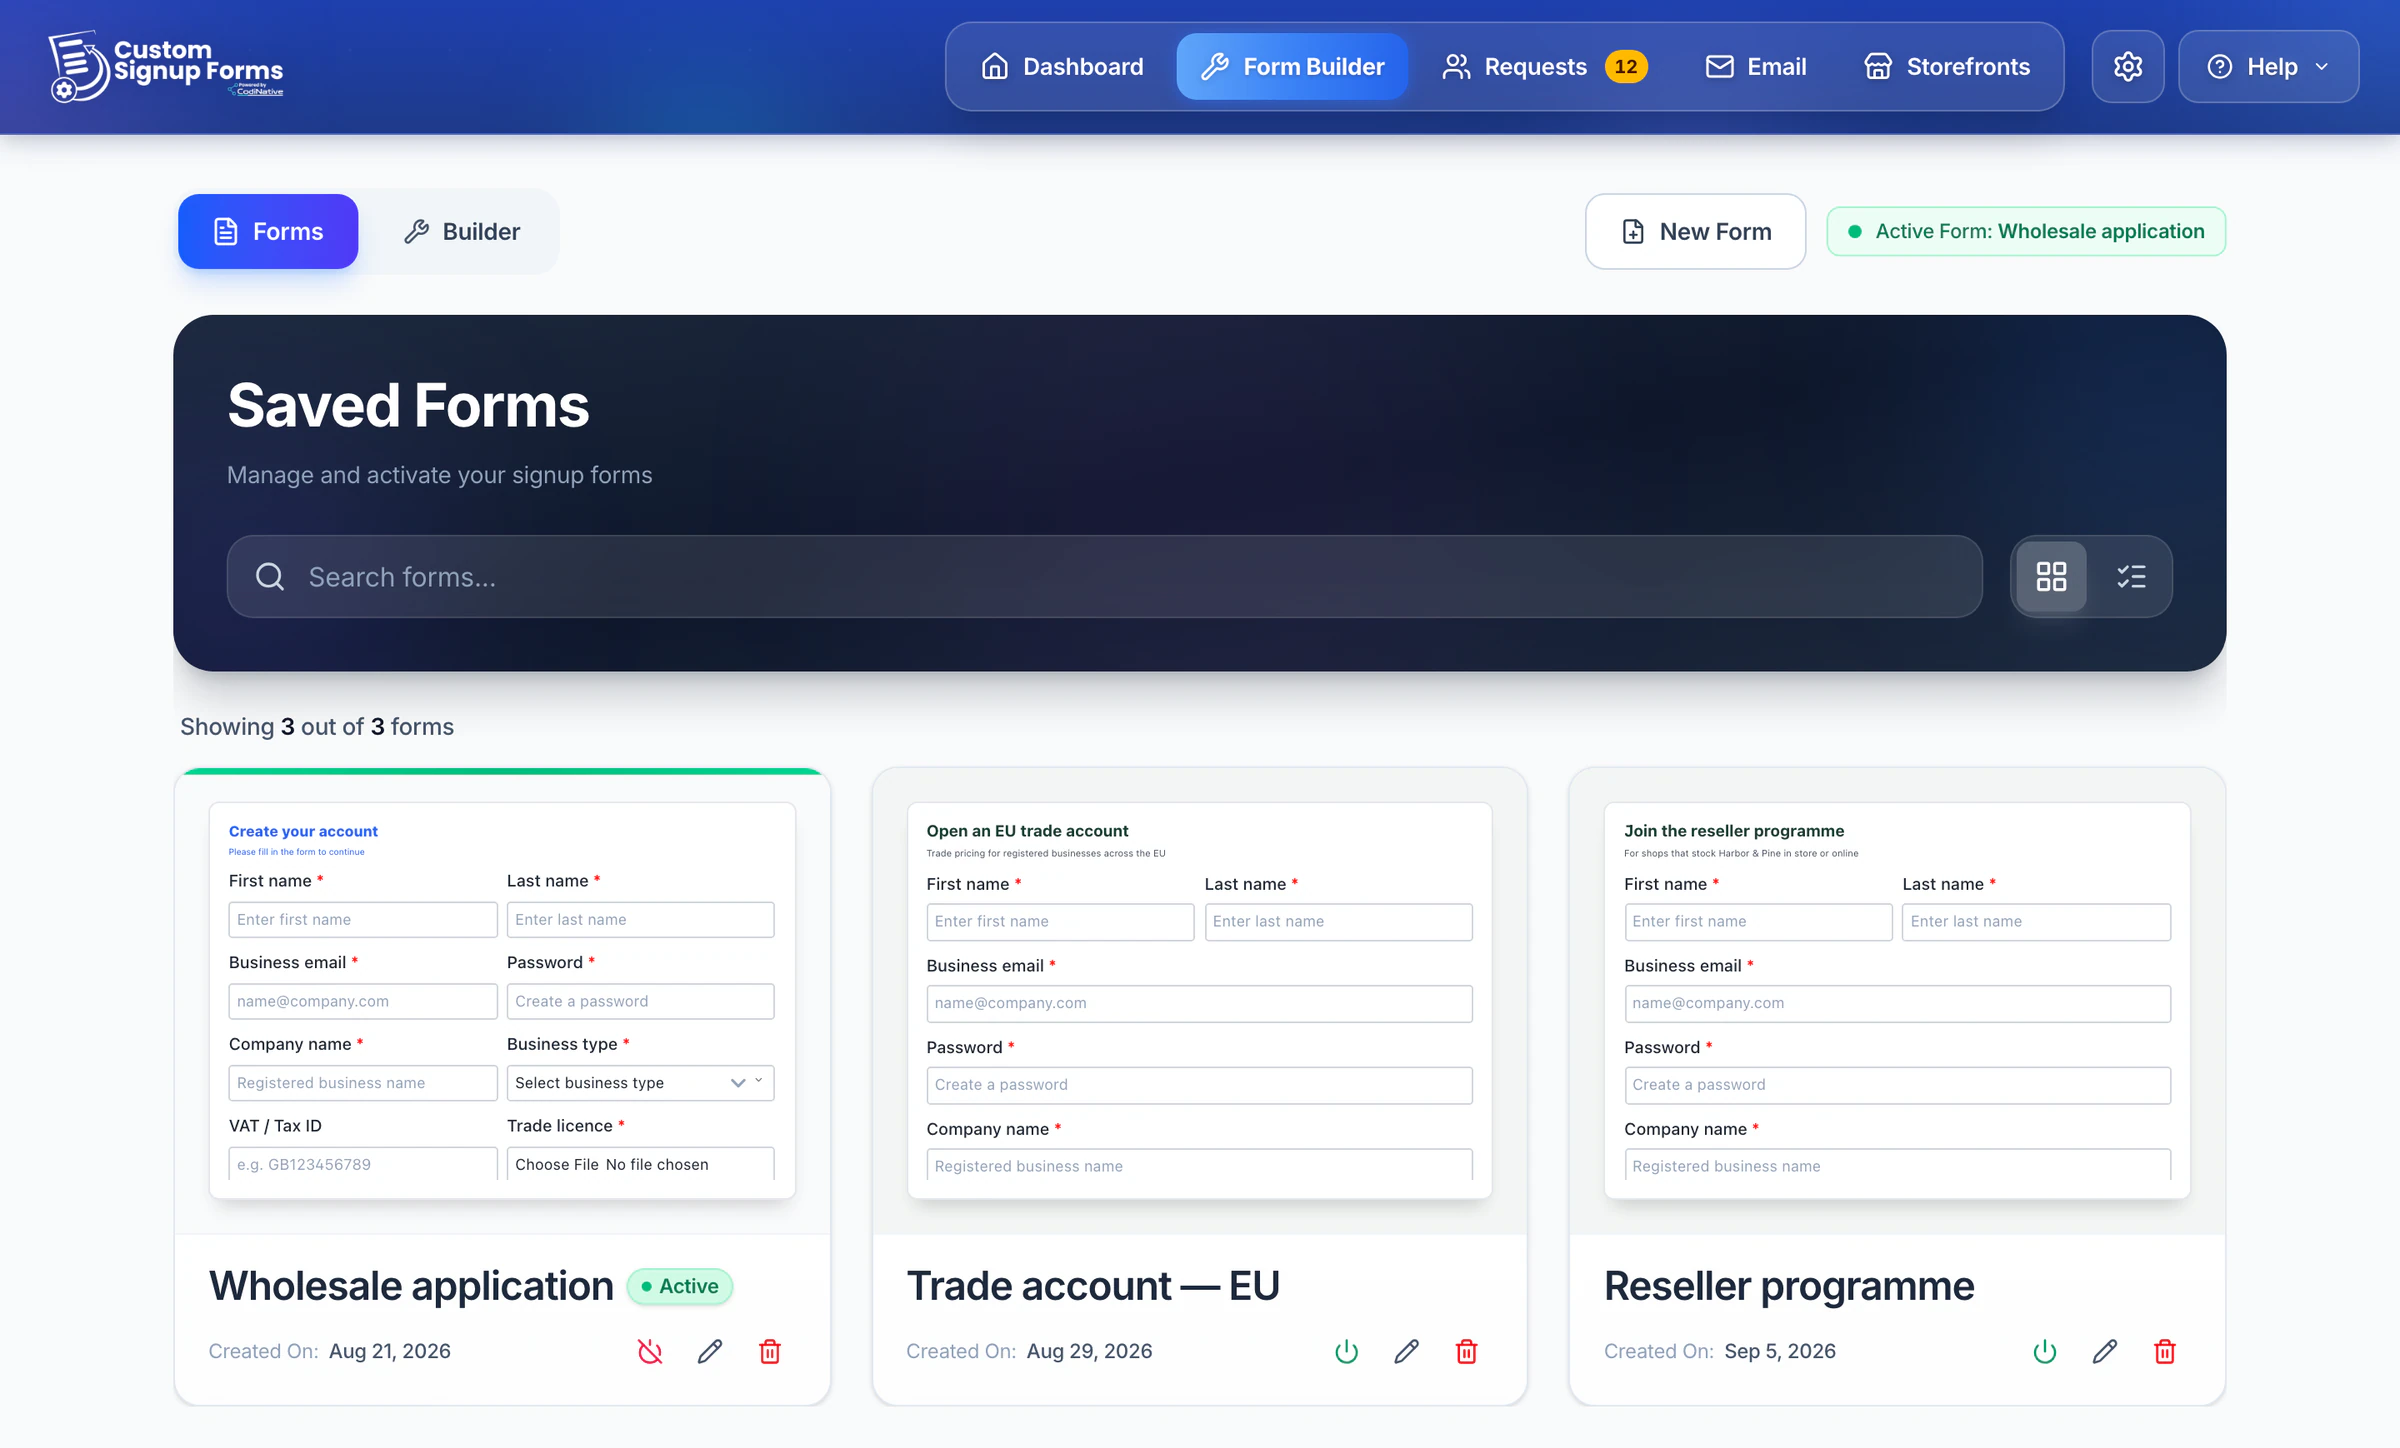
- Click a form to open it in the builder.
- Use the icons on each card to activate or deactivate the form, rename it or delete it.
- New Form starts a blank form. To copy a form, open it and choose Save as new form when you save.
- Search by name and switch between the grid and list views.
The Free plan keeps one saved form; paid plans keep as many as you like. A form that a storefront is serving can't be deleted until that storefront has another form.
Build a form
The builder is a visual editor with a live preview. You add each field with a click, then arrange the fields in the list beside the preview.
In the app: Form Builder → New Form
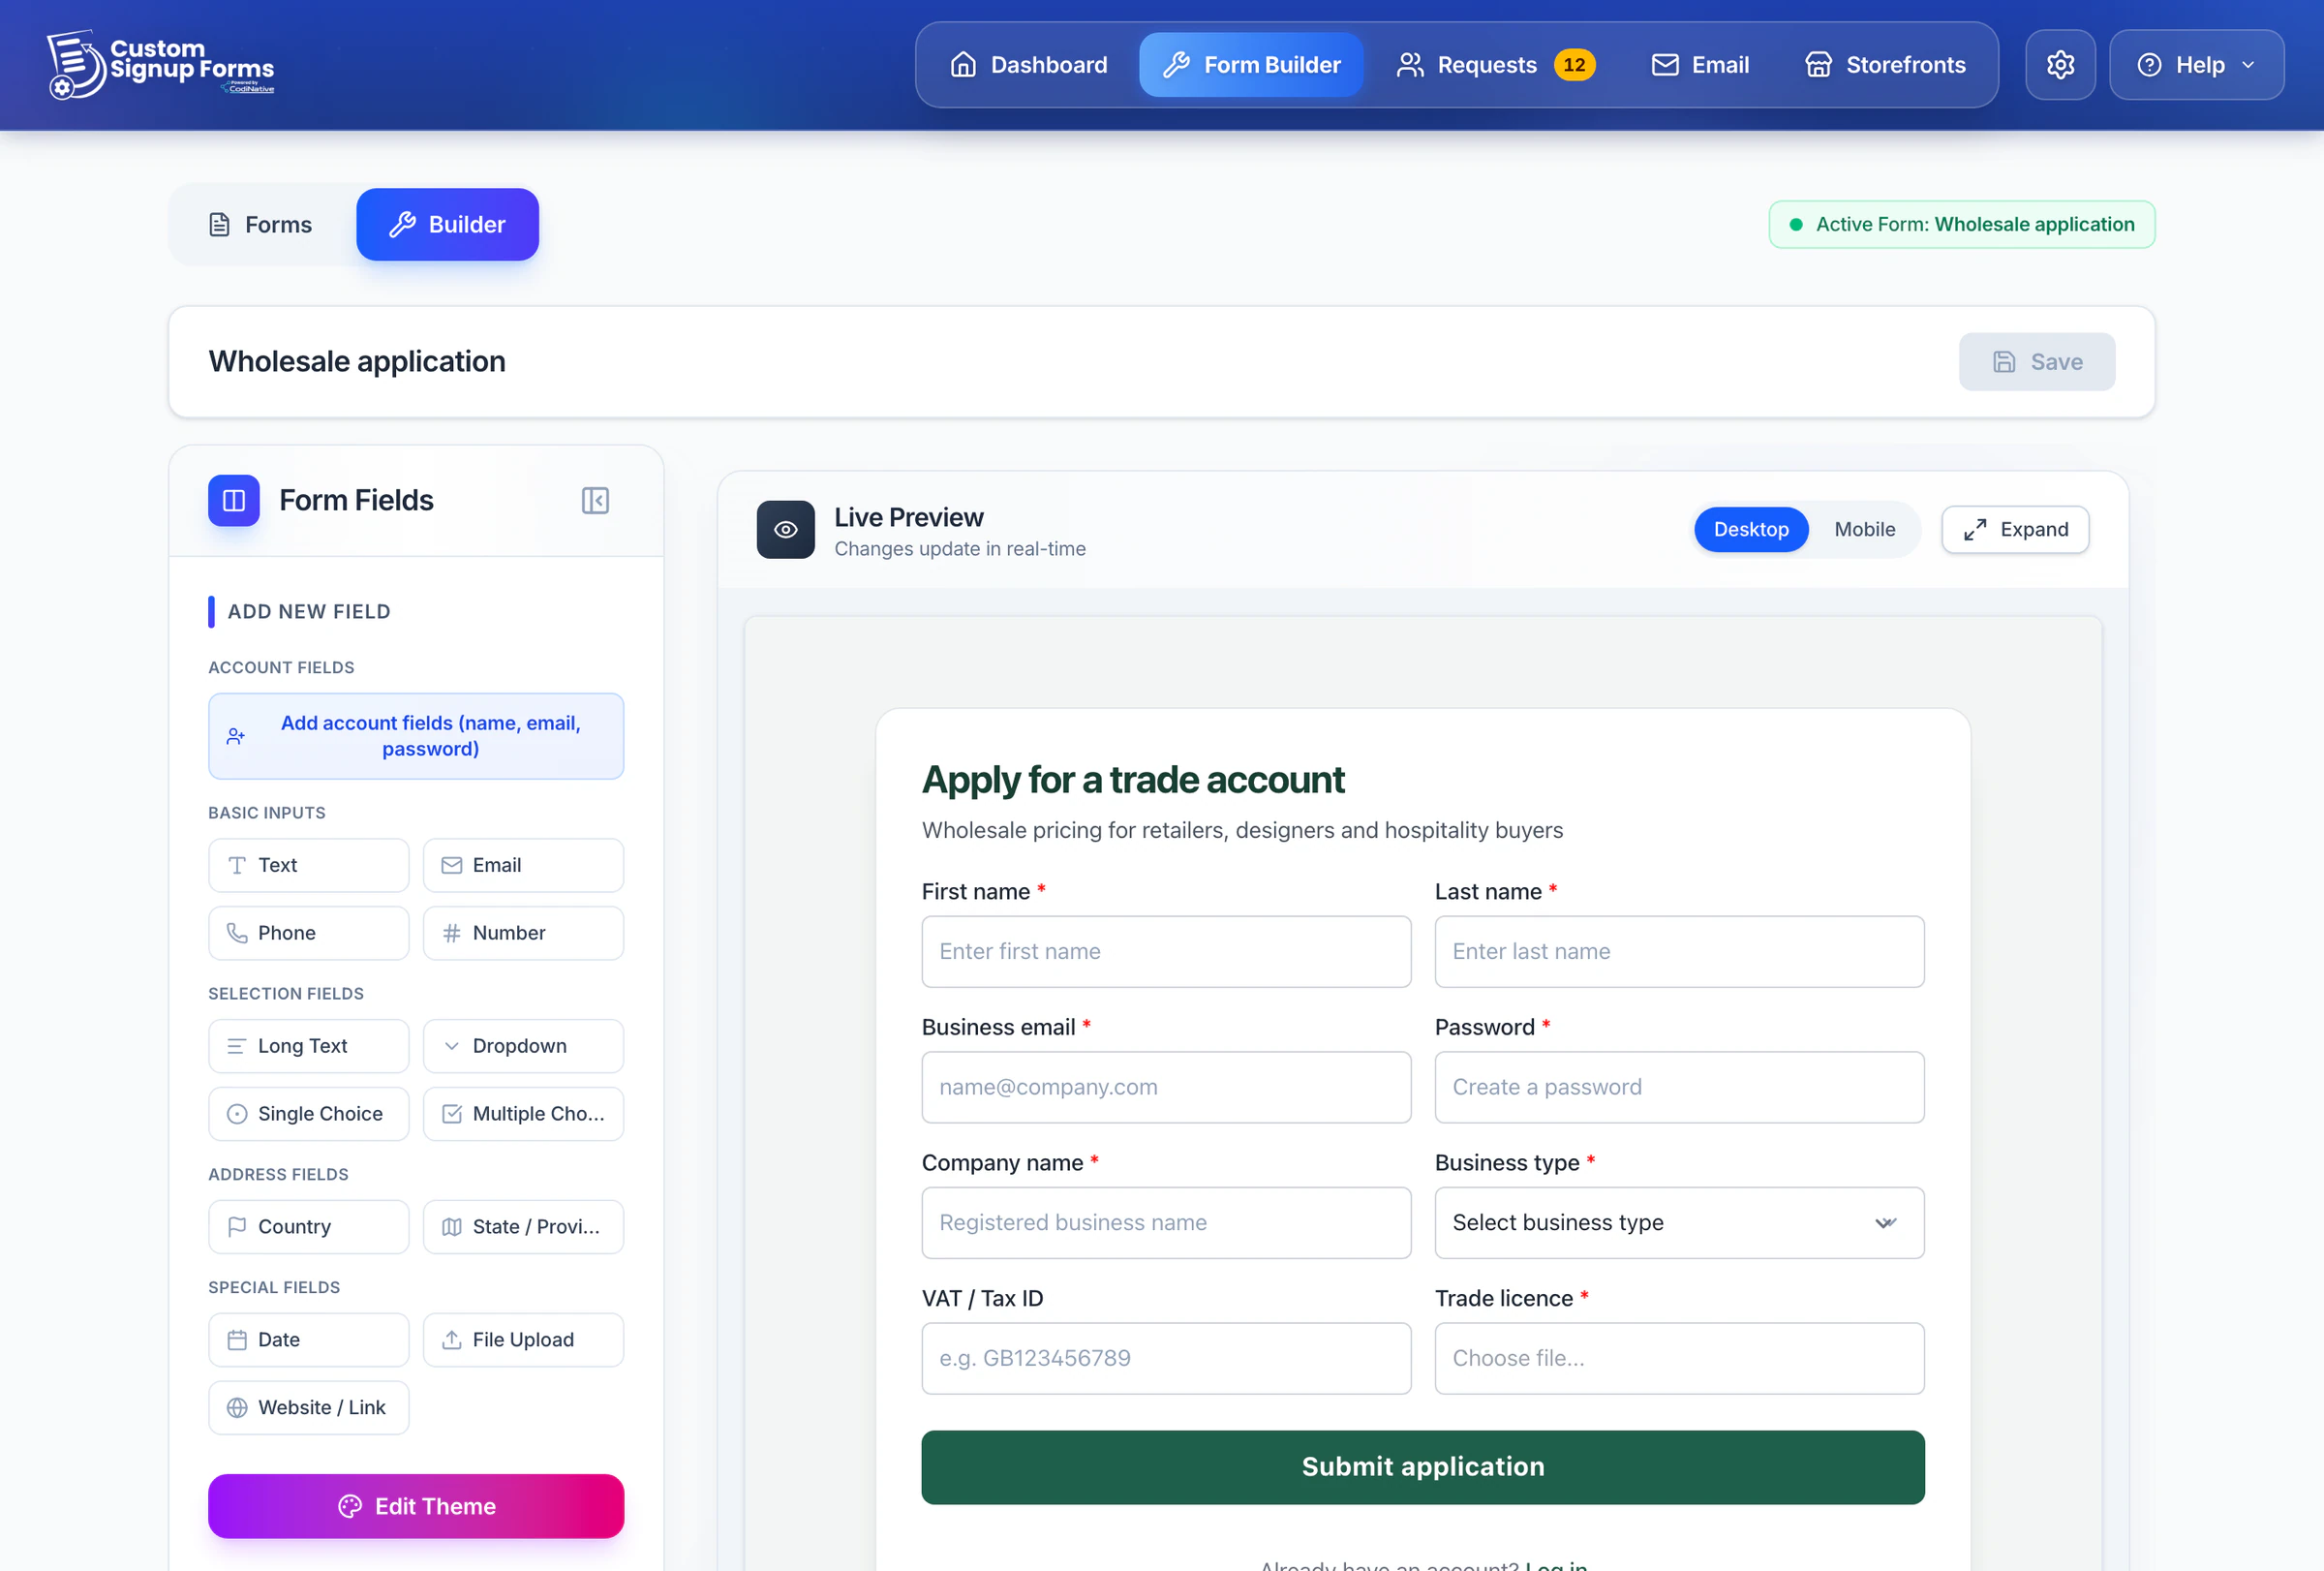
- Click Add account fields (name, email, password). BigCommerce needs First Name, Last Name, Email and Password to create the account, so a form can't be saved without them. They are always required.
- Click a field type: Text, Email, Phone, Number, Long Text, Dropdown, Single Choice, Multiple Choice, Country, State / Province, Date, File Upload or Website / Link.
- In the Add New Field dialog, enter the label (and the options for a choice field), then click Add Field.
- Drag fields in the Form Fields list, under the field types, to change their order. Pair with next field puts two fields side by side.
- Click Save, choose Save to existing form or Save as new form, and give the form a name.
Saving doesn't publish a new form: see Put a form live. The State / Province list follows the country the shopper picks.
File uploads
Standard and upAdd a File Upload field to collect documents such as a trade licence or a tax certificate. Shoppers can upload PDF, Word (DOC, DOCX), Excel (XLS, XLSX), JPG or PNG files of up to 10 MB, and you open them from the request.
Field settings
Click a field in the Form Fields list to open Edit Field. Its sections:
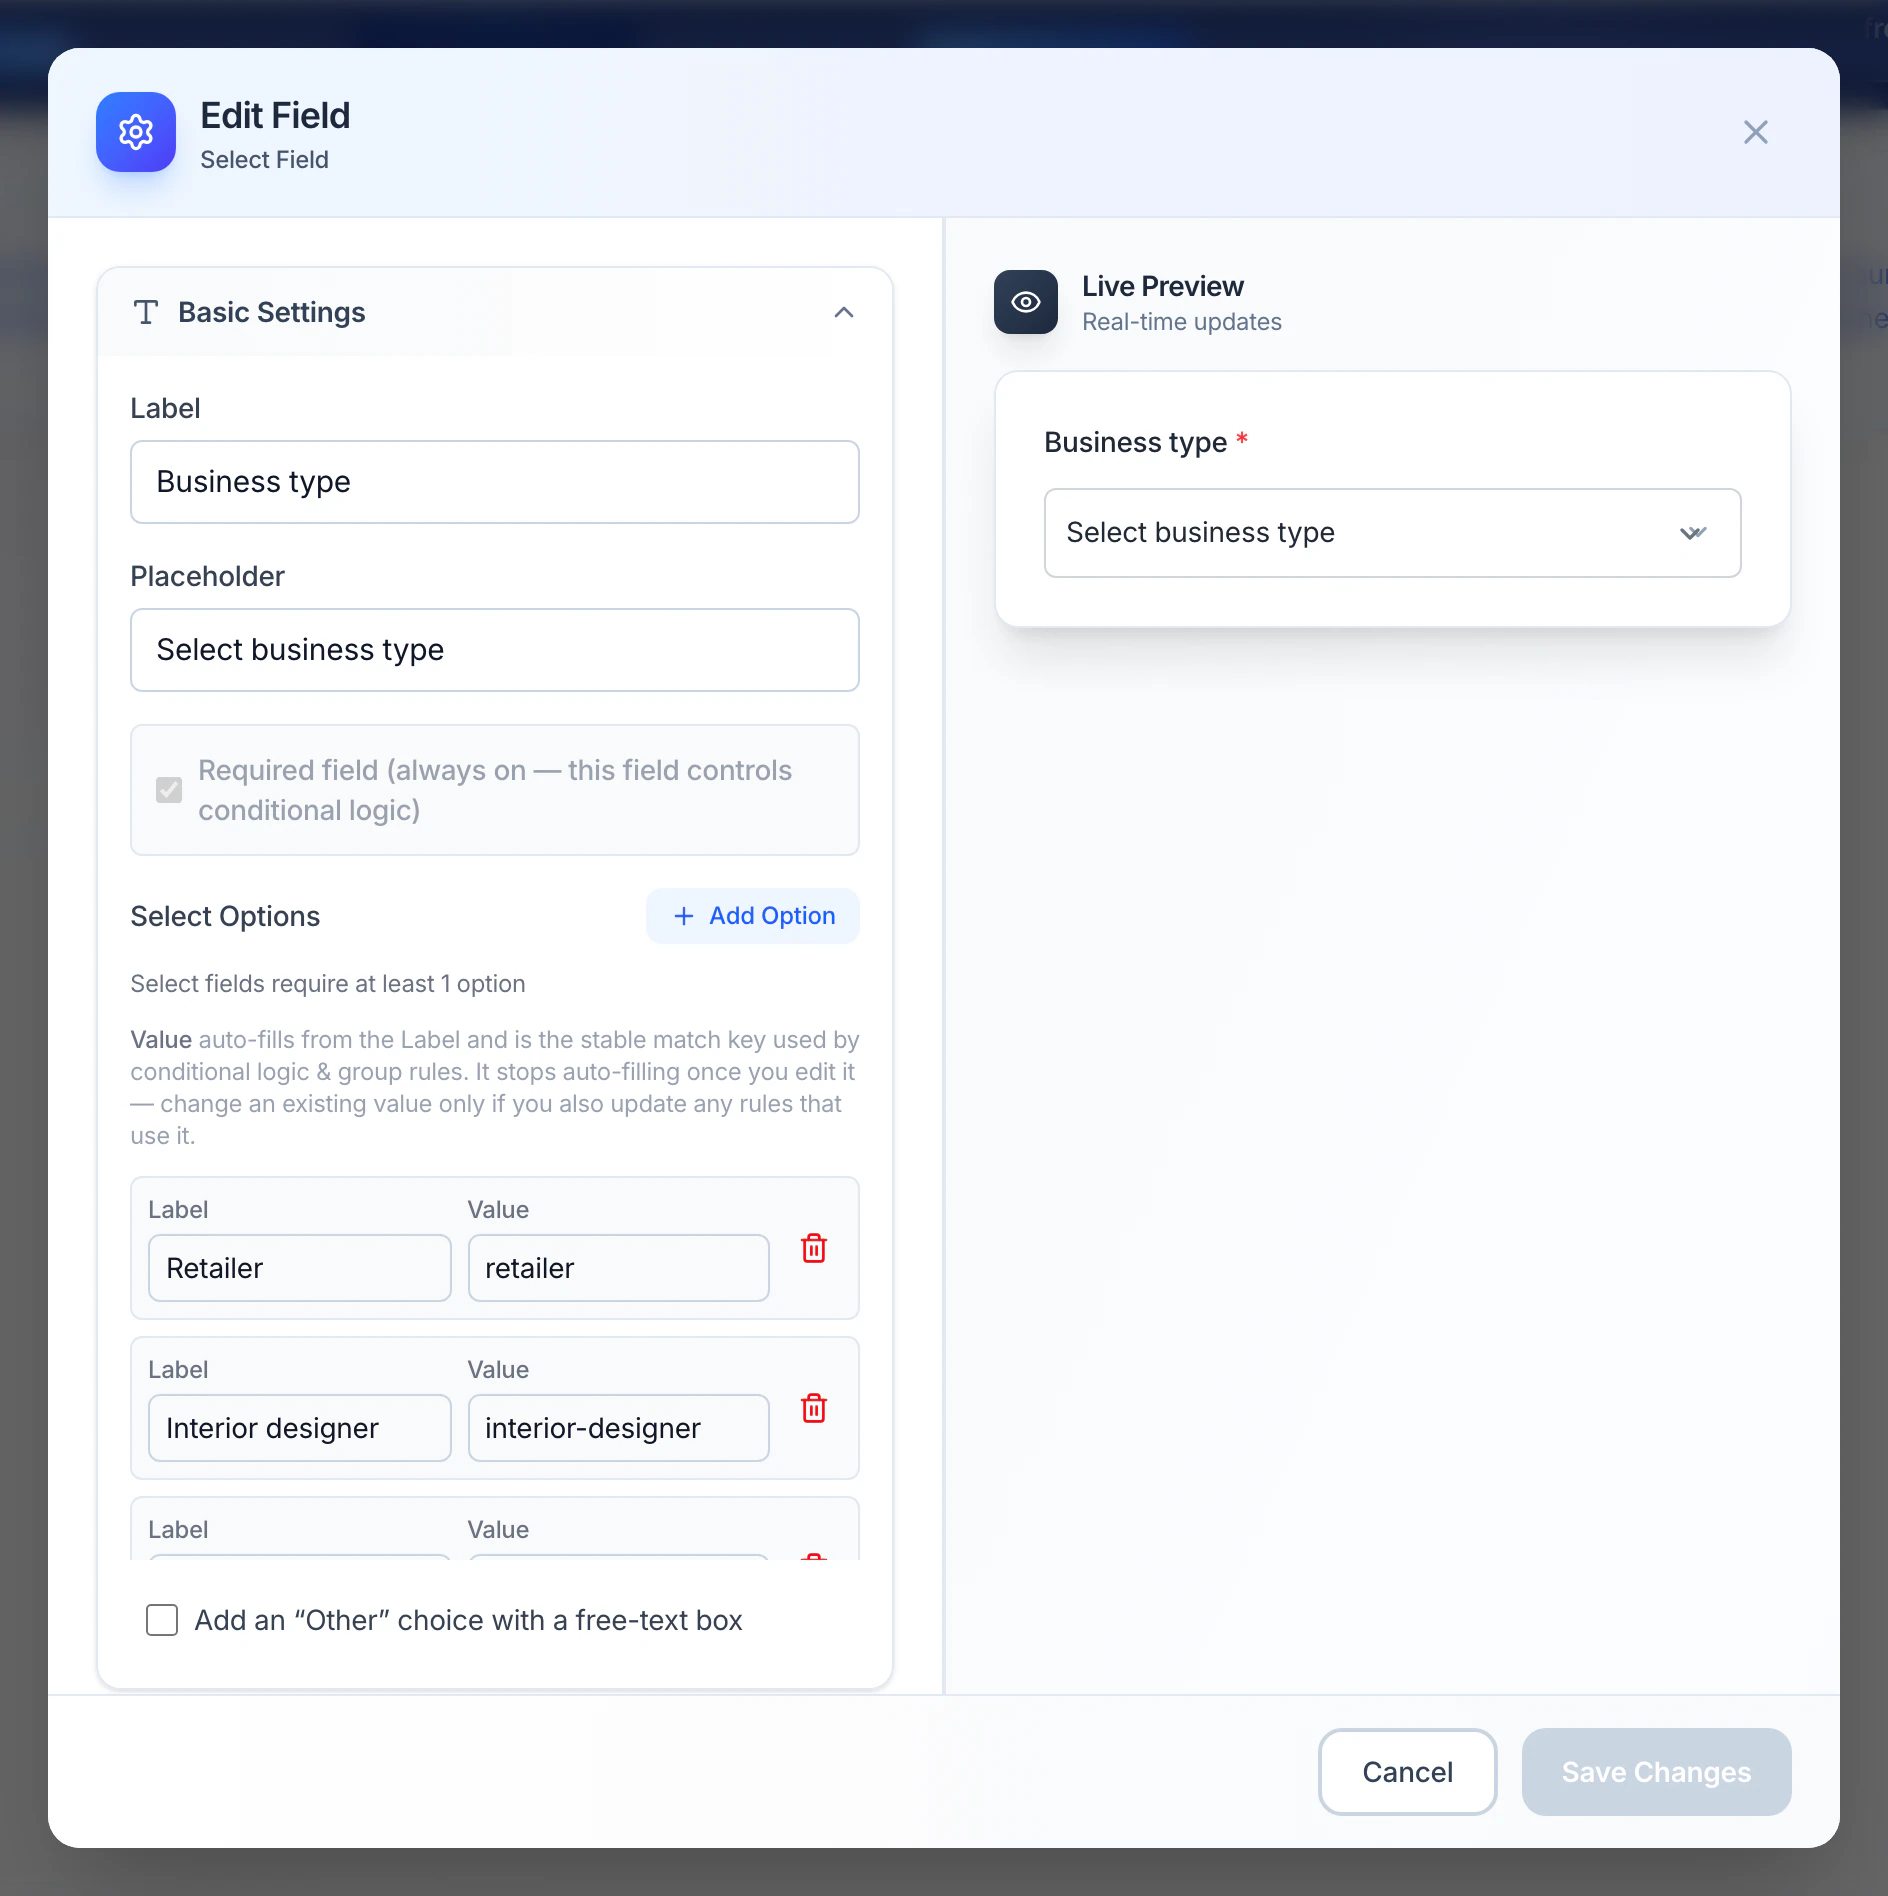
- Basic Settings - the label, the placeholder and whether the field is required.
- Options (Dropdown, Single Choice, Multiple Choice) - a label and a value for each option. Tick Add an “Other” choice with a free-text box to let shoppers type their own answer (Standard and up).
- Conditional Logic - show other fields depending on the answer. See below.
- Heading / Description - text above or below the field, as a bold heading or a muted description. It is only shown, never submitted.
- Label Styling and Input Styling - colours, sizes, borders, radius and padding for this field.
Save Changes updates your draft; the form itself is stored when you click Save in the top bar.
Conditional logic
Show a field only when it is relevant, for example a portfolio link only for interior designers. Logic is available on Standard and up.
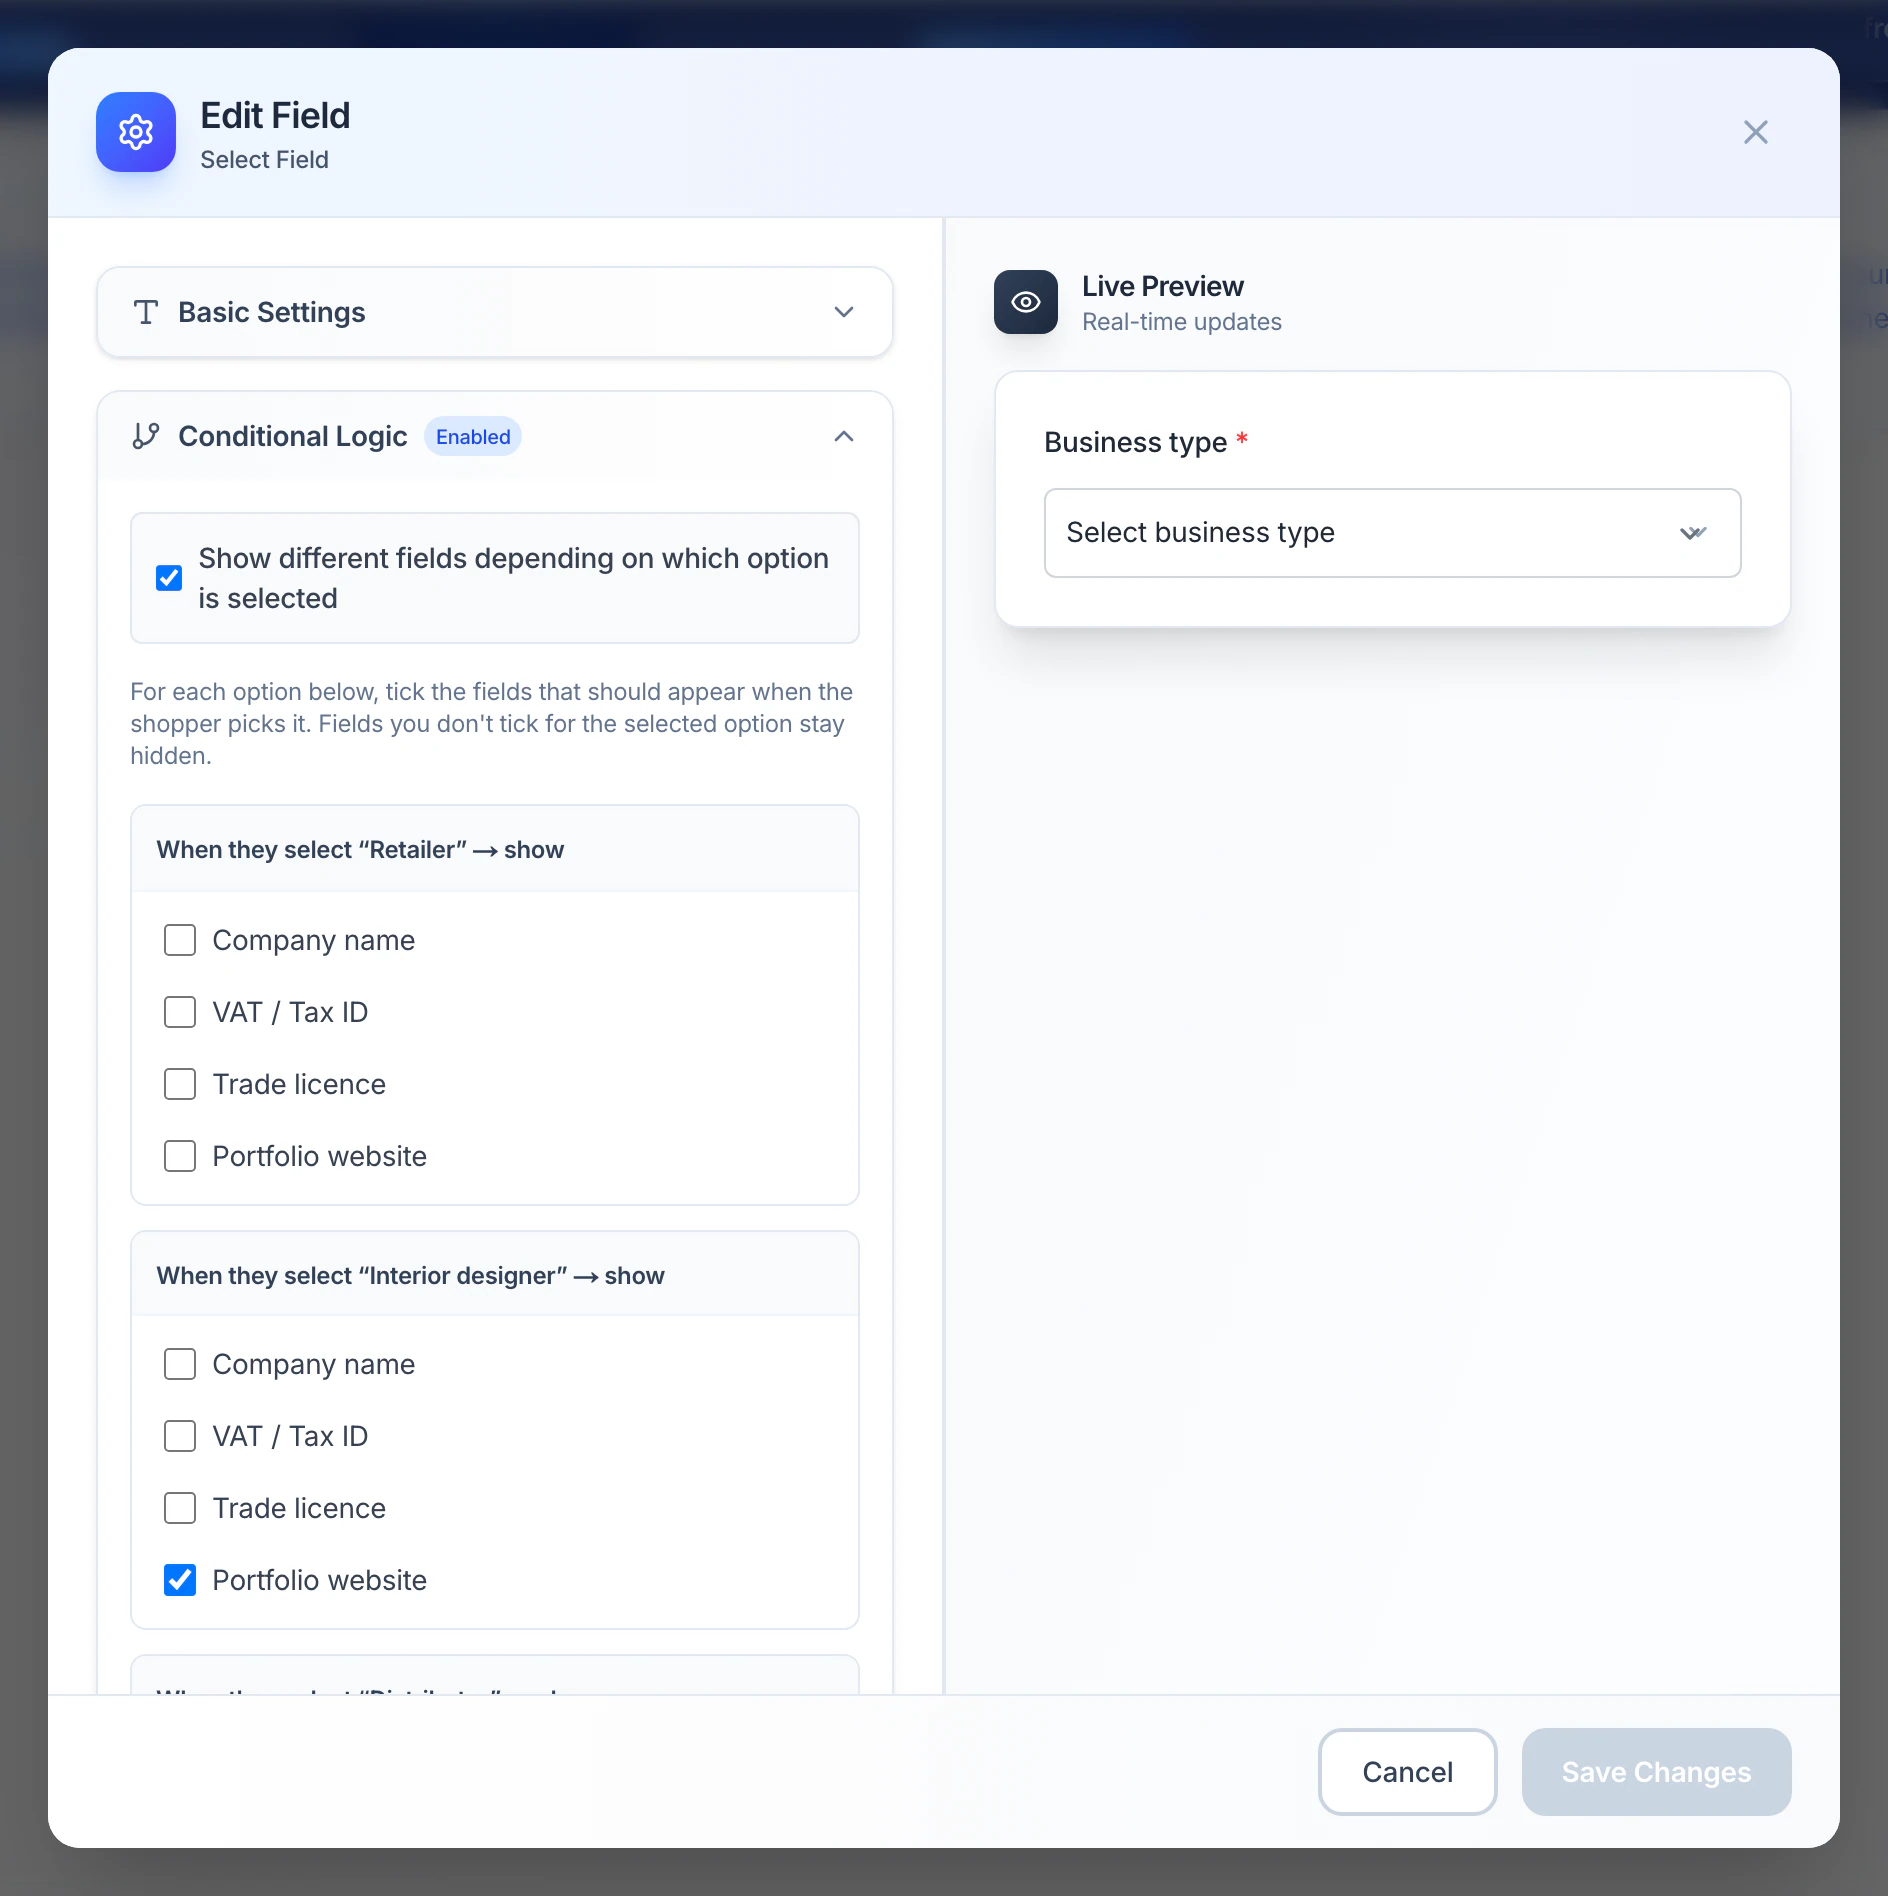
- In the Form Fields list, click a Dropdown, Single Choice or Multiple Choice field.
- Open Conditional Logic and tick Show different fields depending on which option is selected.
- Under each option, tick the fields to show when a shopper picks it. Fields you don't tick for the chosen option stay hidden.
- Click Save Changes, then Save the form.
- The controlling field becomes required, and the account fields can't be hidden.
- A field can be shown by one controlling field only.
- Hidden fields aren't checked or submitted.
- The same answers can pick the customer group and the version of an email the applicant gets.
Theme and preview
Click Edit Theme, under the field types, to style the whole form.
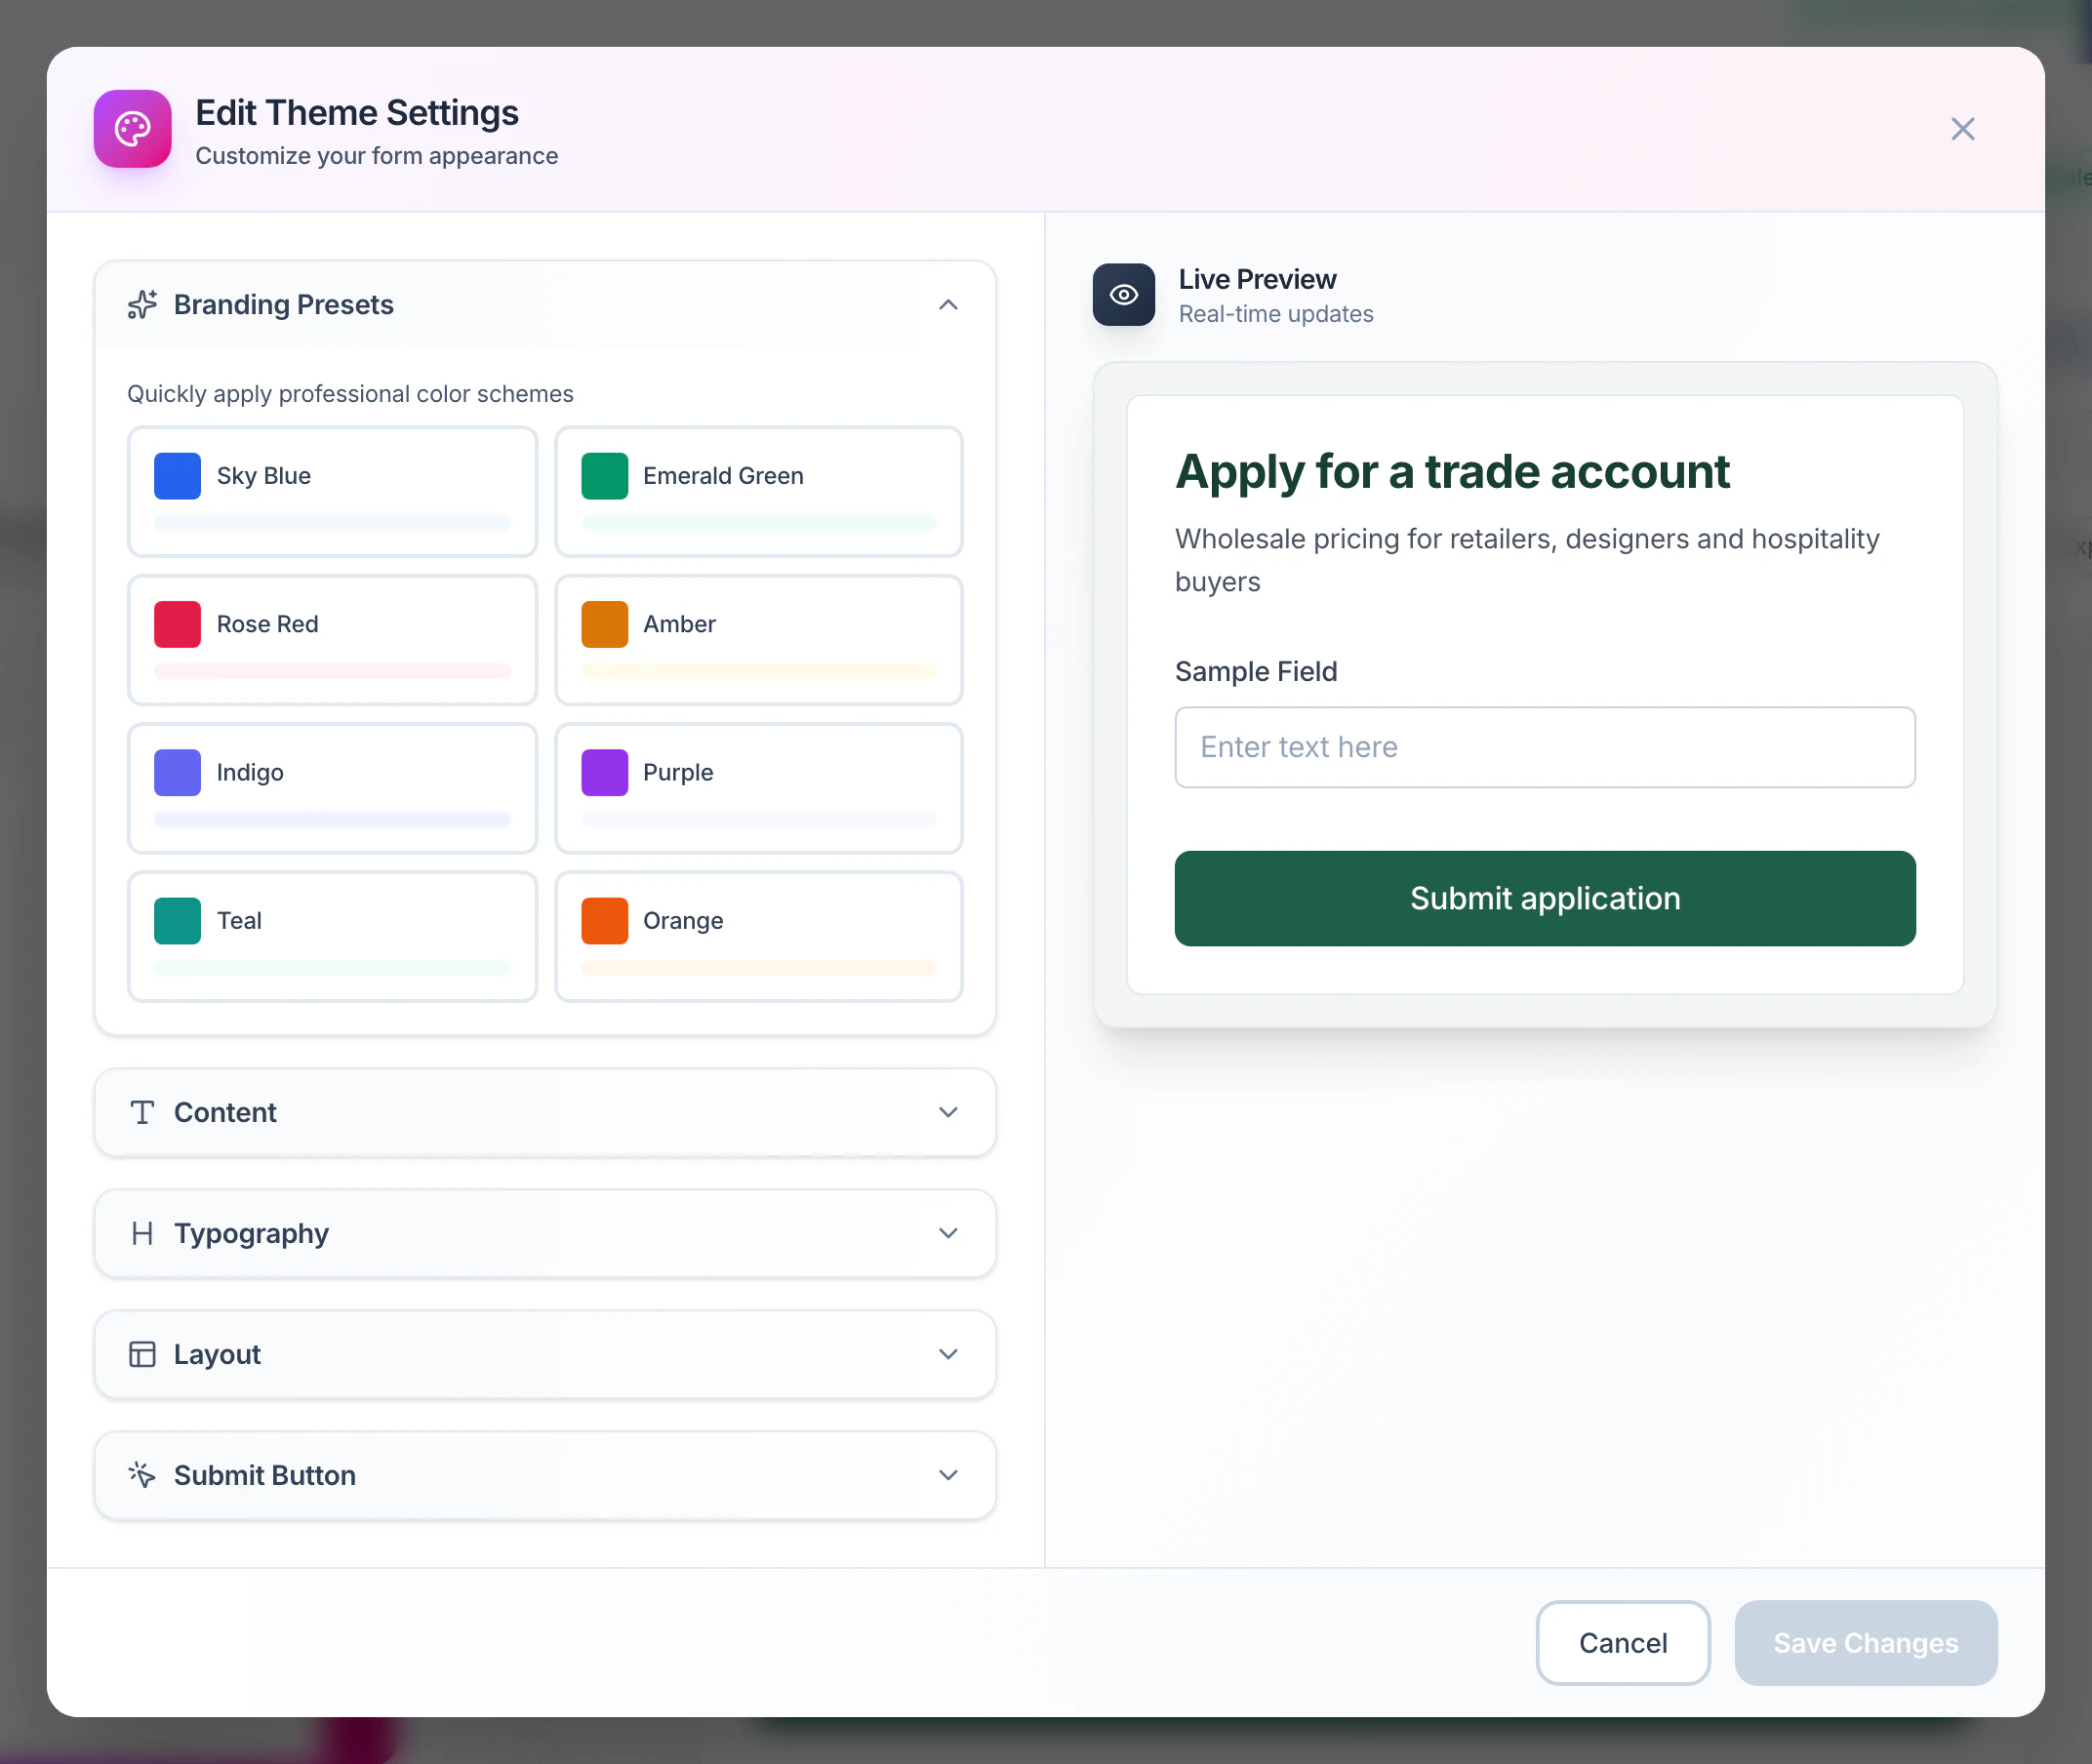
- Branding Presets - eight ready-made colour schemes.
- Content - the title, subtitle, primary colour and form background.
- Typography - colour, size and weight of the title and subtitle.
- Layout - Center, or Split with an image beside the form (paste the image's URL), and the page background.
- Submit Button - its text, colours and corner radius.
The live preview switches between Desktop and Mobile; Expand opens a full-page preview.
On the Free plan the form shows a small “Powered by” line. Paid plans remove it.
Put a form live
On a single storefront, the active form replaces BigCommerce's create-account form. No theme edits are needed.
- Go to Form Builder → Forms.
- On the form's card, click the Activate icon and confirm.
- The app adds a script called Custom Signup Form to your store's Script Manager, and shoppers see your form on the create-account page.
- Open your store's create-account page to check it, and send a test application.
- Editing the live form - save it as usual; shoppers get the new version the next time the page loads.
- Deactivate - removes the script, and shoppers get BigCommerce's own form again.
- More than one storefront - with multi-storefront on, you assign a form to each storefront instead. See Multi-storefront.
After submitting, the shopper sees a thank-you message, and the application waits for you in Requests.
Review requests
Each application becomes a request. Nothing is created in BigCommerce until you approve it.
In the app: Requests
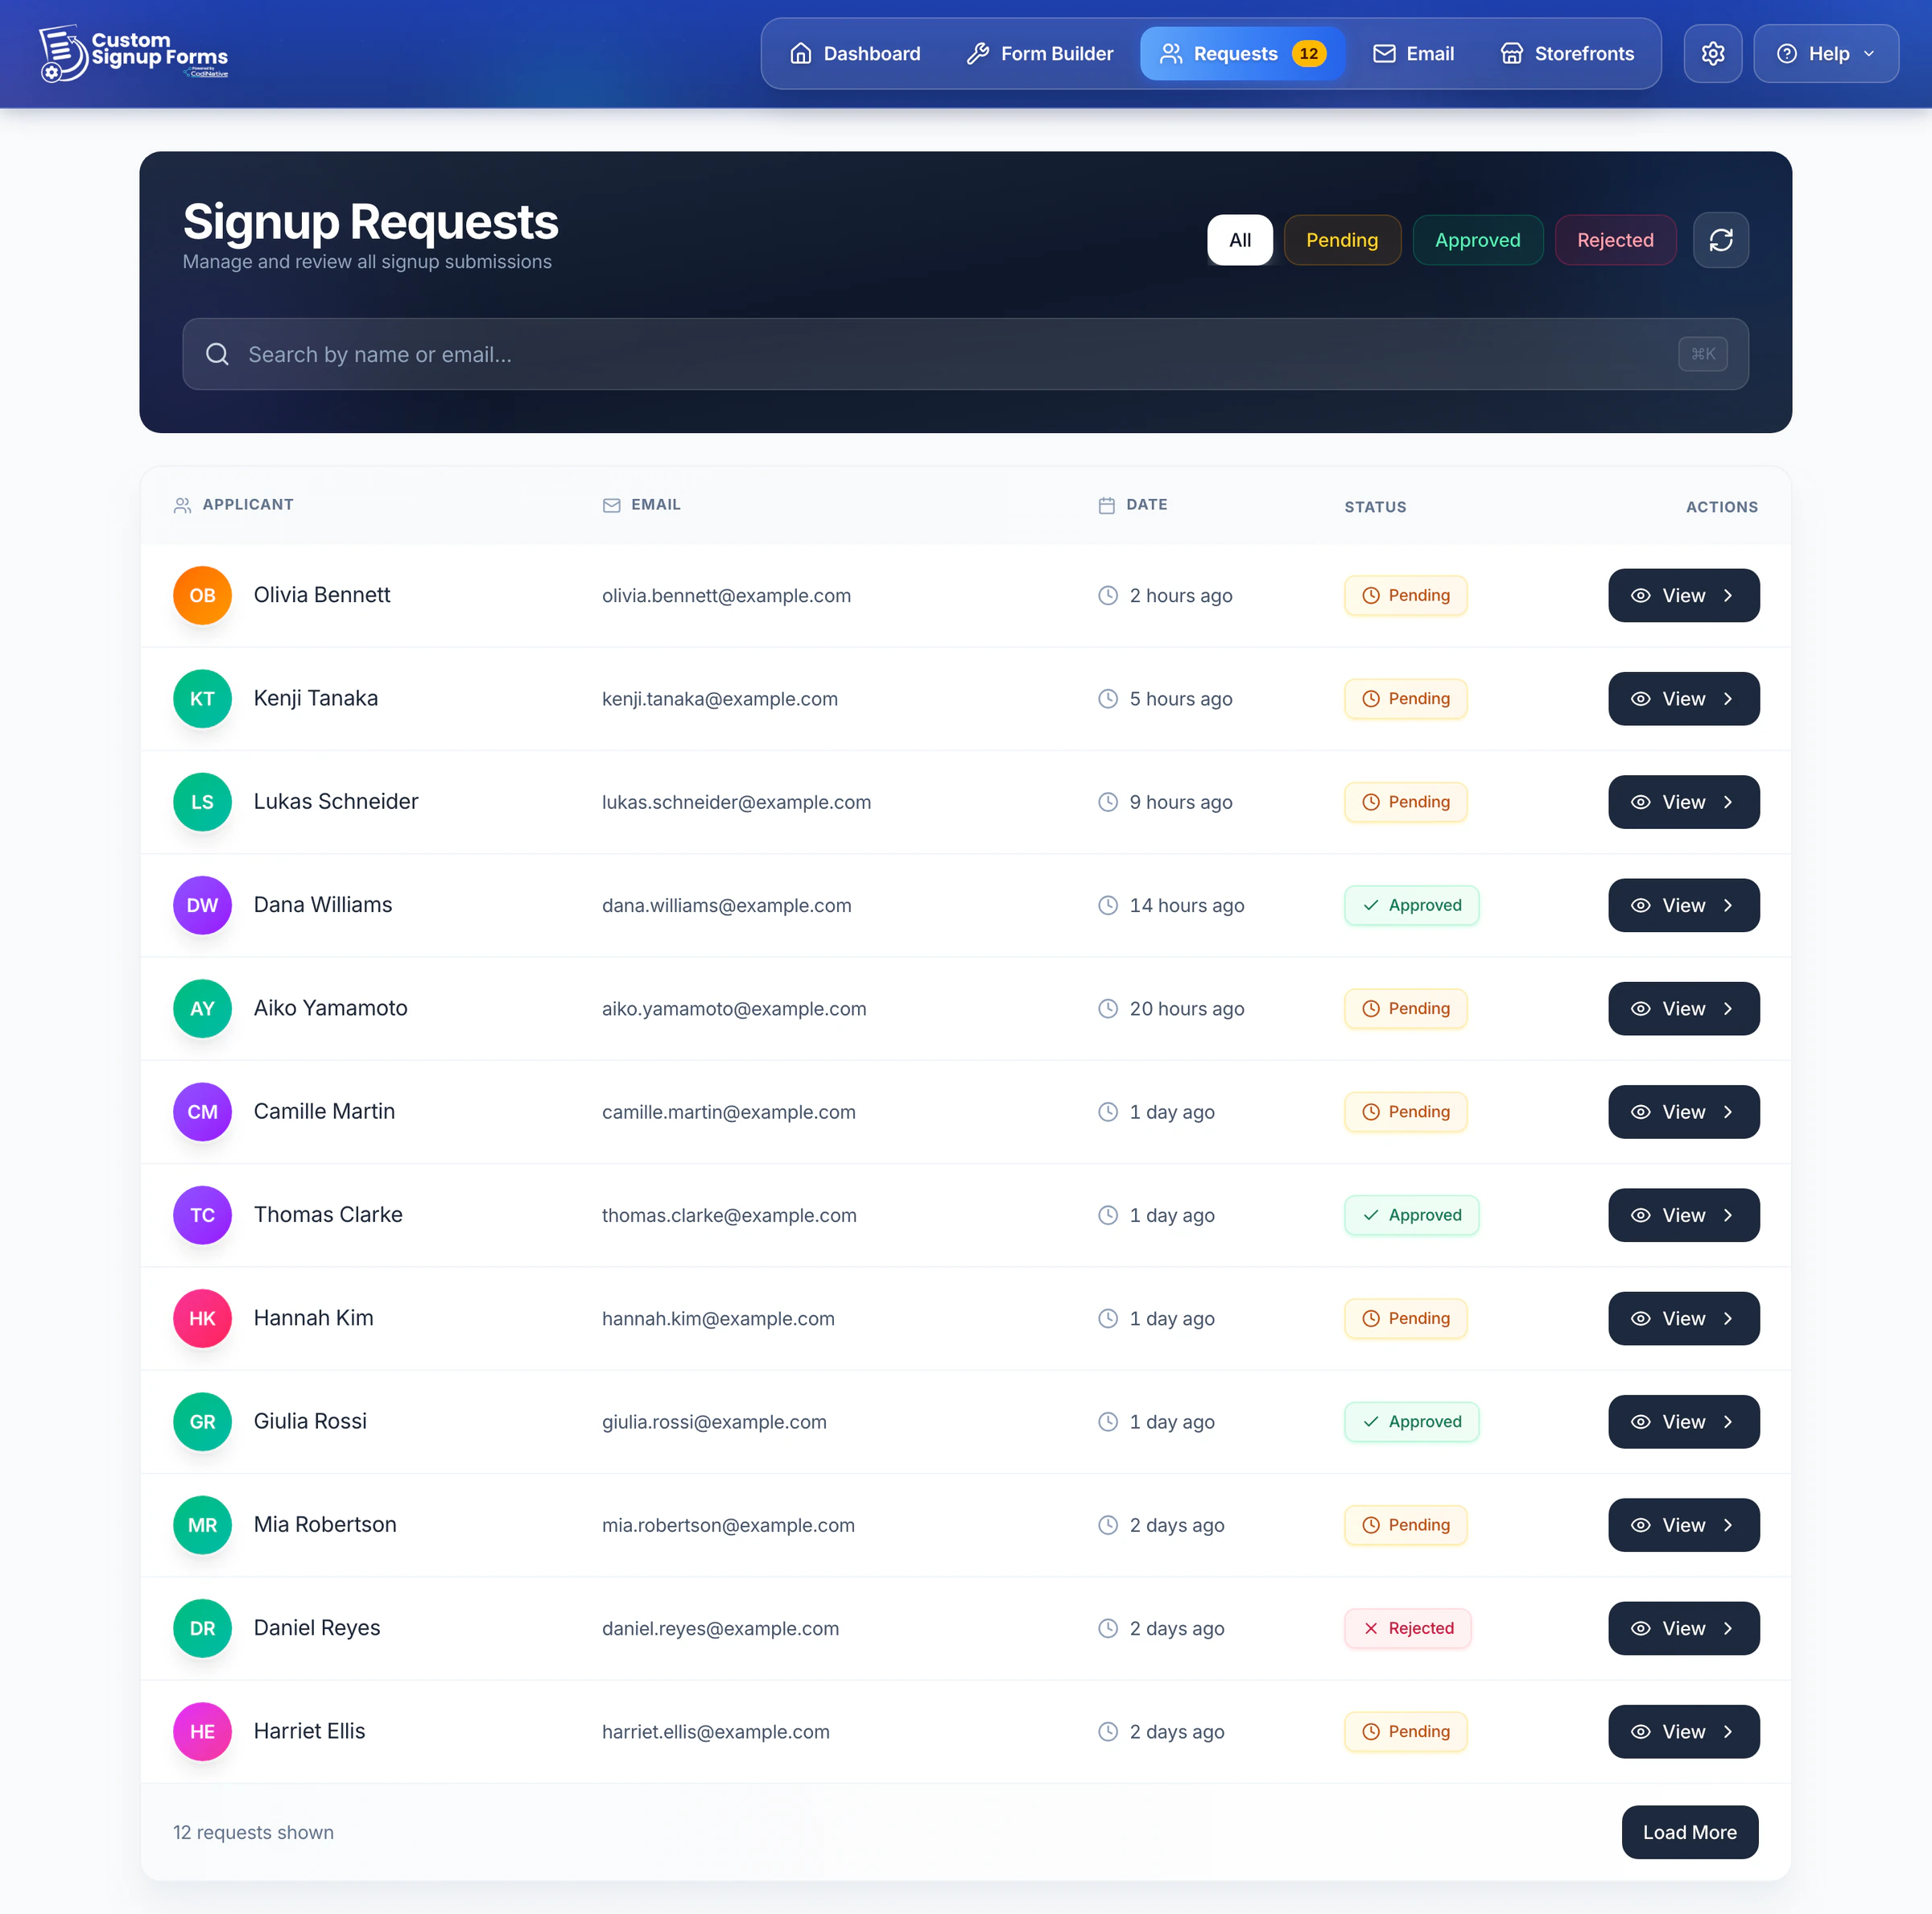
- Filter by All, Pending, Approved or Rejected, or search by name or email.
- Twelve requests load at a time; Load More fetches the next ones.
- Click View to open a request.
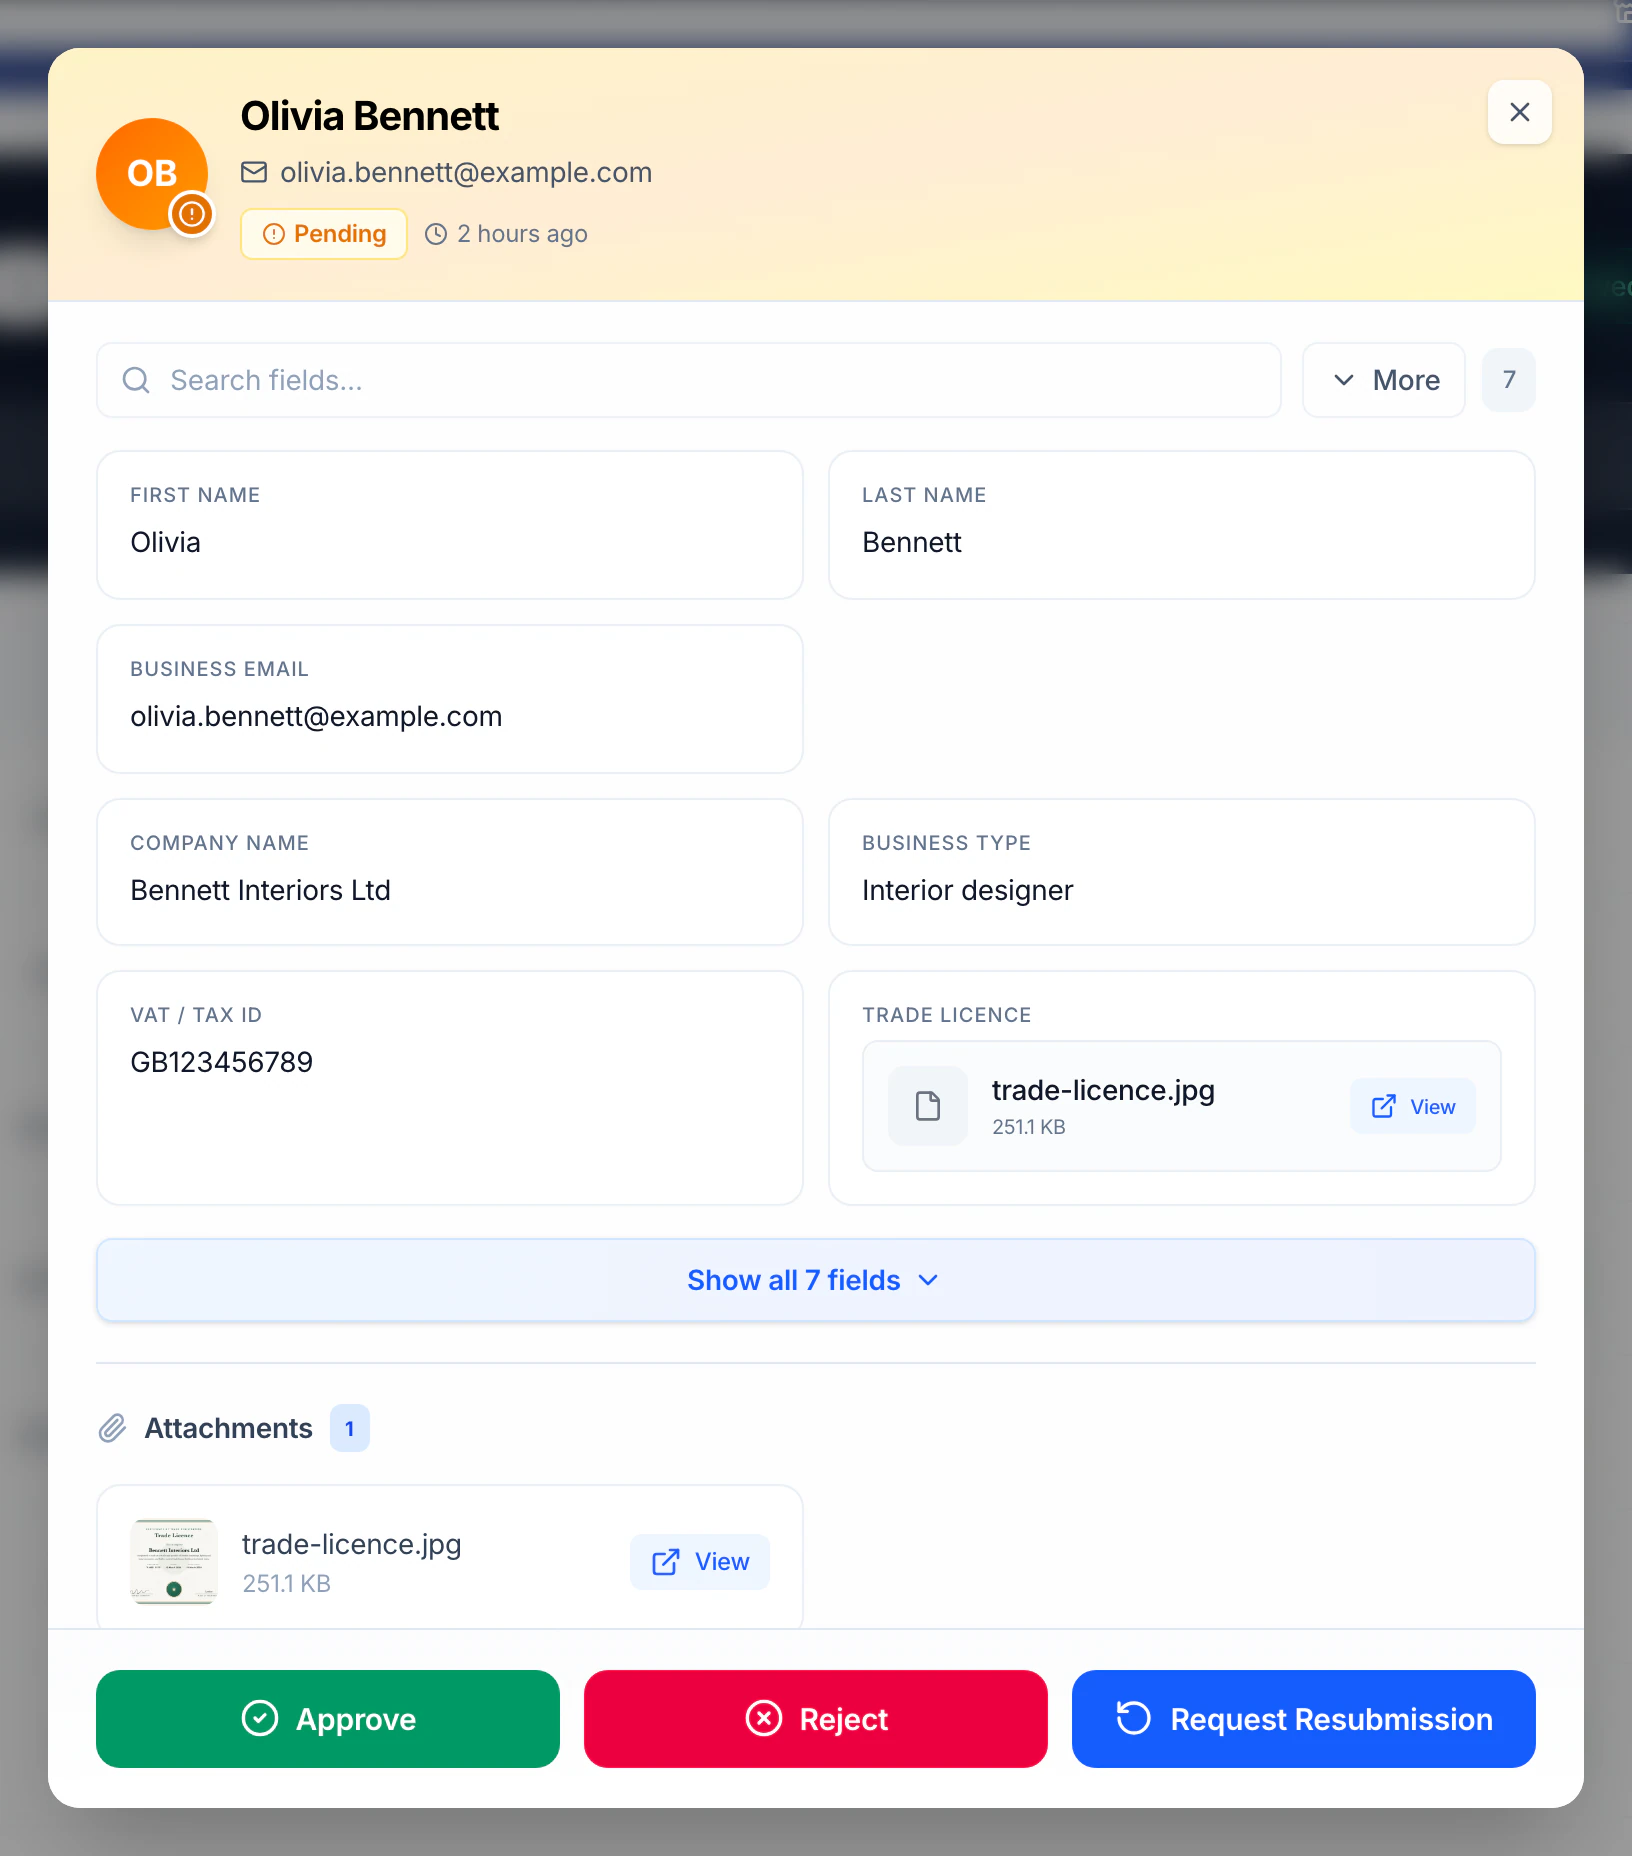
The request shows every answer with its label from your form (passwords are never shown) and each uploaded file, which opens in a new tab. Use Search fields on long forms.
Approve, reject, resubmit
A pending request has three buttons: Approve, Reject and Request Resubmission.
Approve
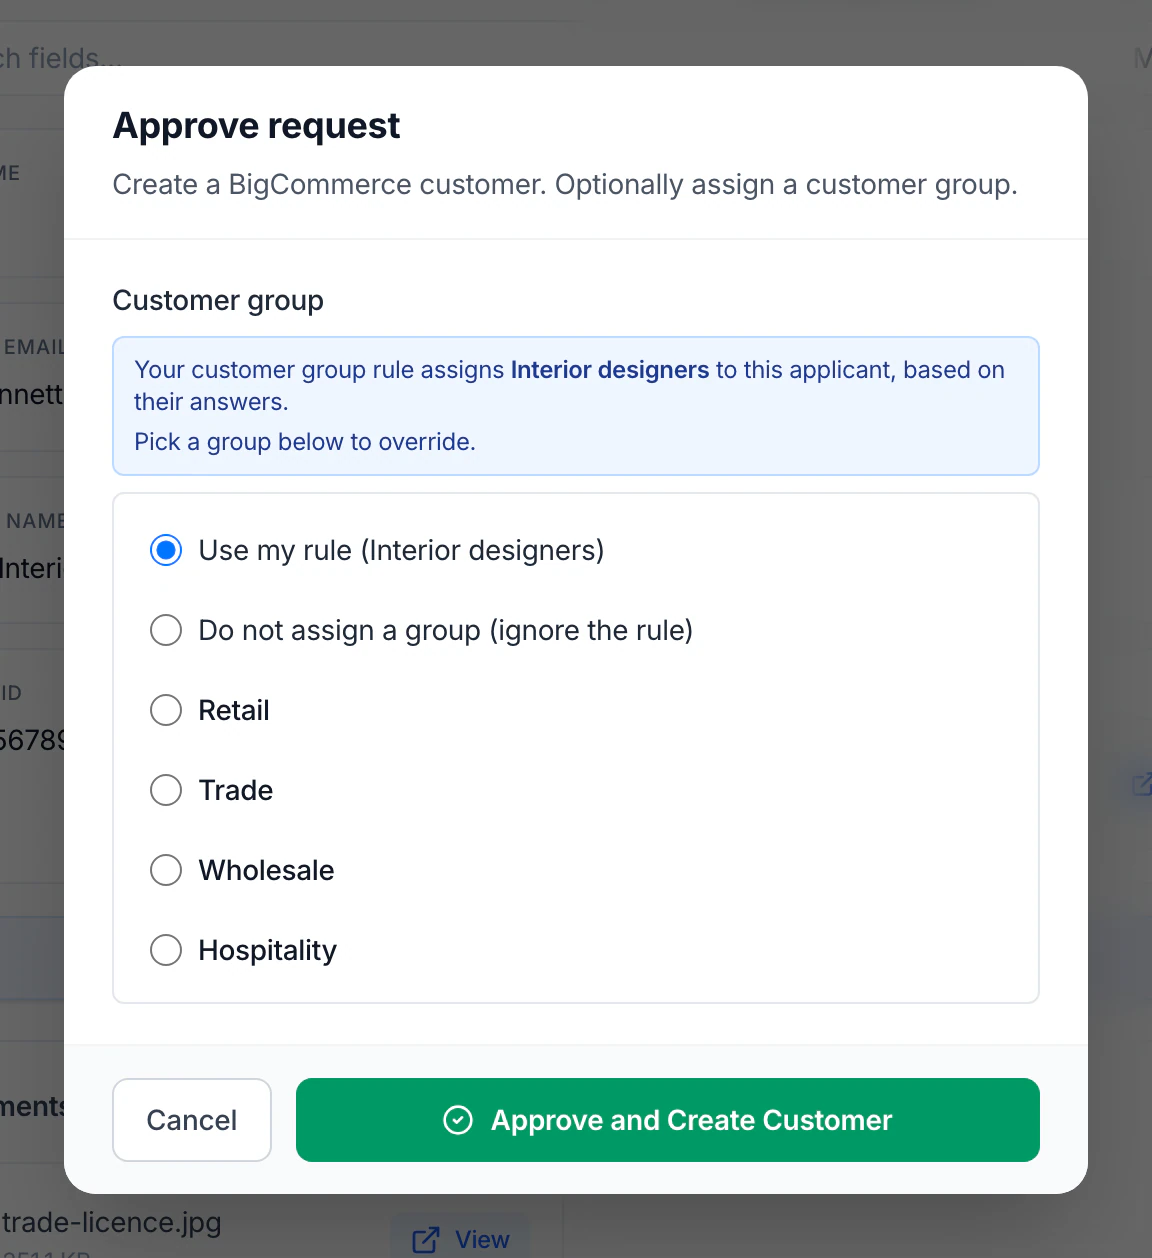
- Click Approve.
- Choose the Customer group: your rule's group, your store's default, a specific group, or none.
- Click Approve and Create Customer.
The app creates the customer in BigCommerce, on the storefront the applicant used, in the chosen group. When customer emails are set up, it then sends the Approval Email, which asks the customer to set a password with “Forgot your password?”: for security, the password typed on the form isn't used. Apart from the name, email and (when your form asks for them) phone, company and address, the answers stay in the app rather than on the BigCommerce customer.
On the Free plan, approving creates the account only: no customer group and no email. Tell the applicant to sign in with “Forgot your password?”.
Reject
Click Reject and confirm. The applicant gets your Rejection Email (when customer emails are set up) and can't apply again with that email address until the cooldown period ends: 7 days by default, 3 days on the Free plan. On paid plans, set up the Rejection Email template before you reject. If someone should be allowed to apply sooner, open their rejected request and click Reset Cooldown.
Request Resubmission
Standard and up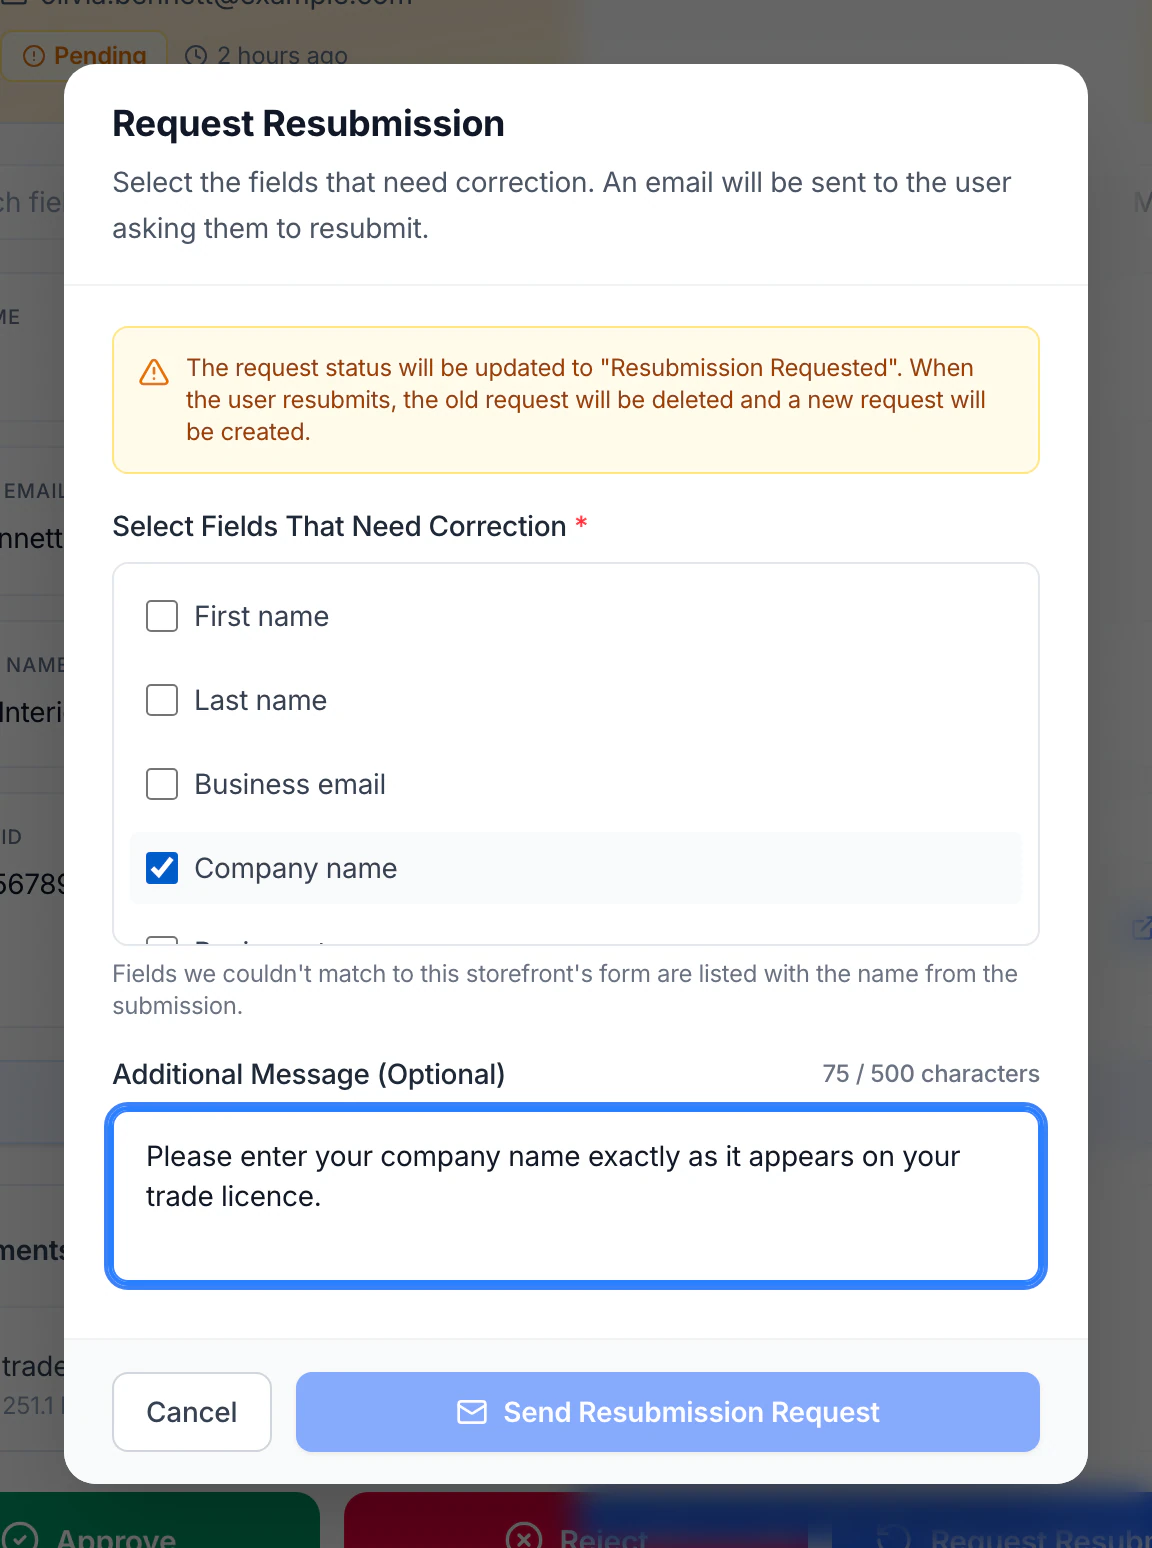
- Click Request Resubmission.
- Tick the fields that need correcting and, if you like, add a message (up to 500 characters).
- Click Send Resubmission Request.
The applicant gets the Resubmission Request email listing those fields. When they resubmit, the old request is replaced by a new pending one and they get the Resubmission Confirmation email.
Duplicates
Someone with a pending request, or an approved account, can't submit the form again with the same email address. They are told why on the form.
Customer emails
Customer emails are part of the Standard plan and up. They are sent from your own email address, so set up sending first.
Set up sending (SMTP)
In the app: Email → Email Settings
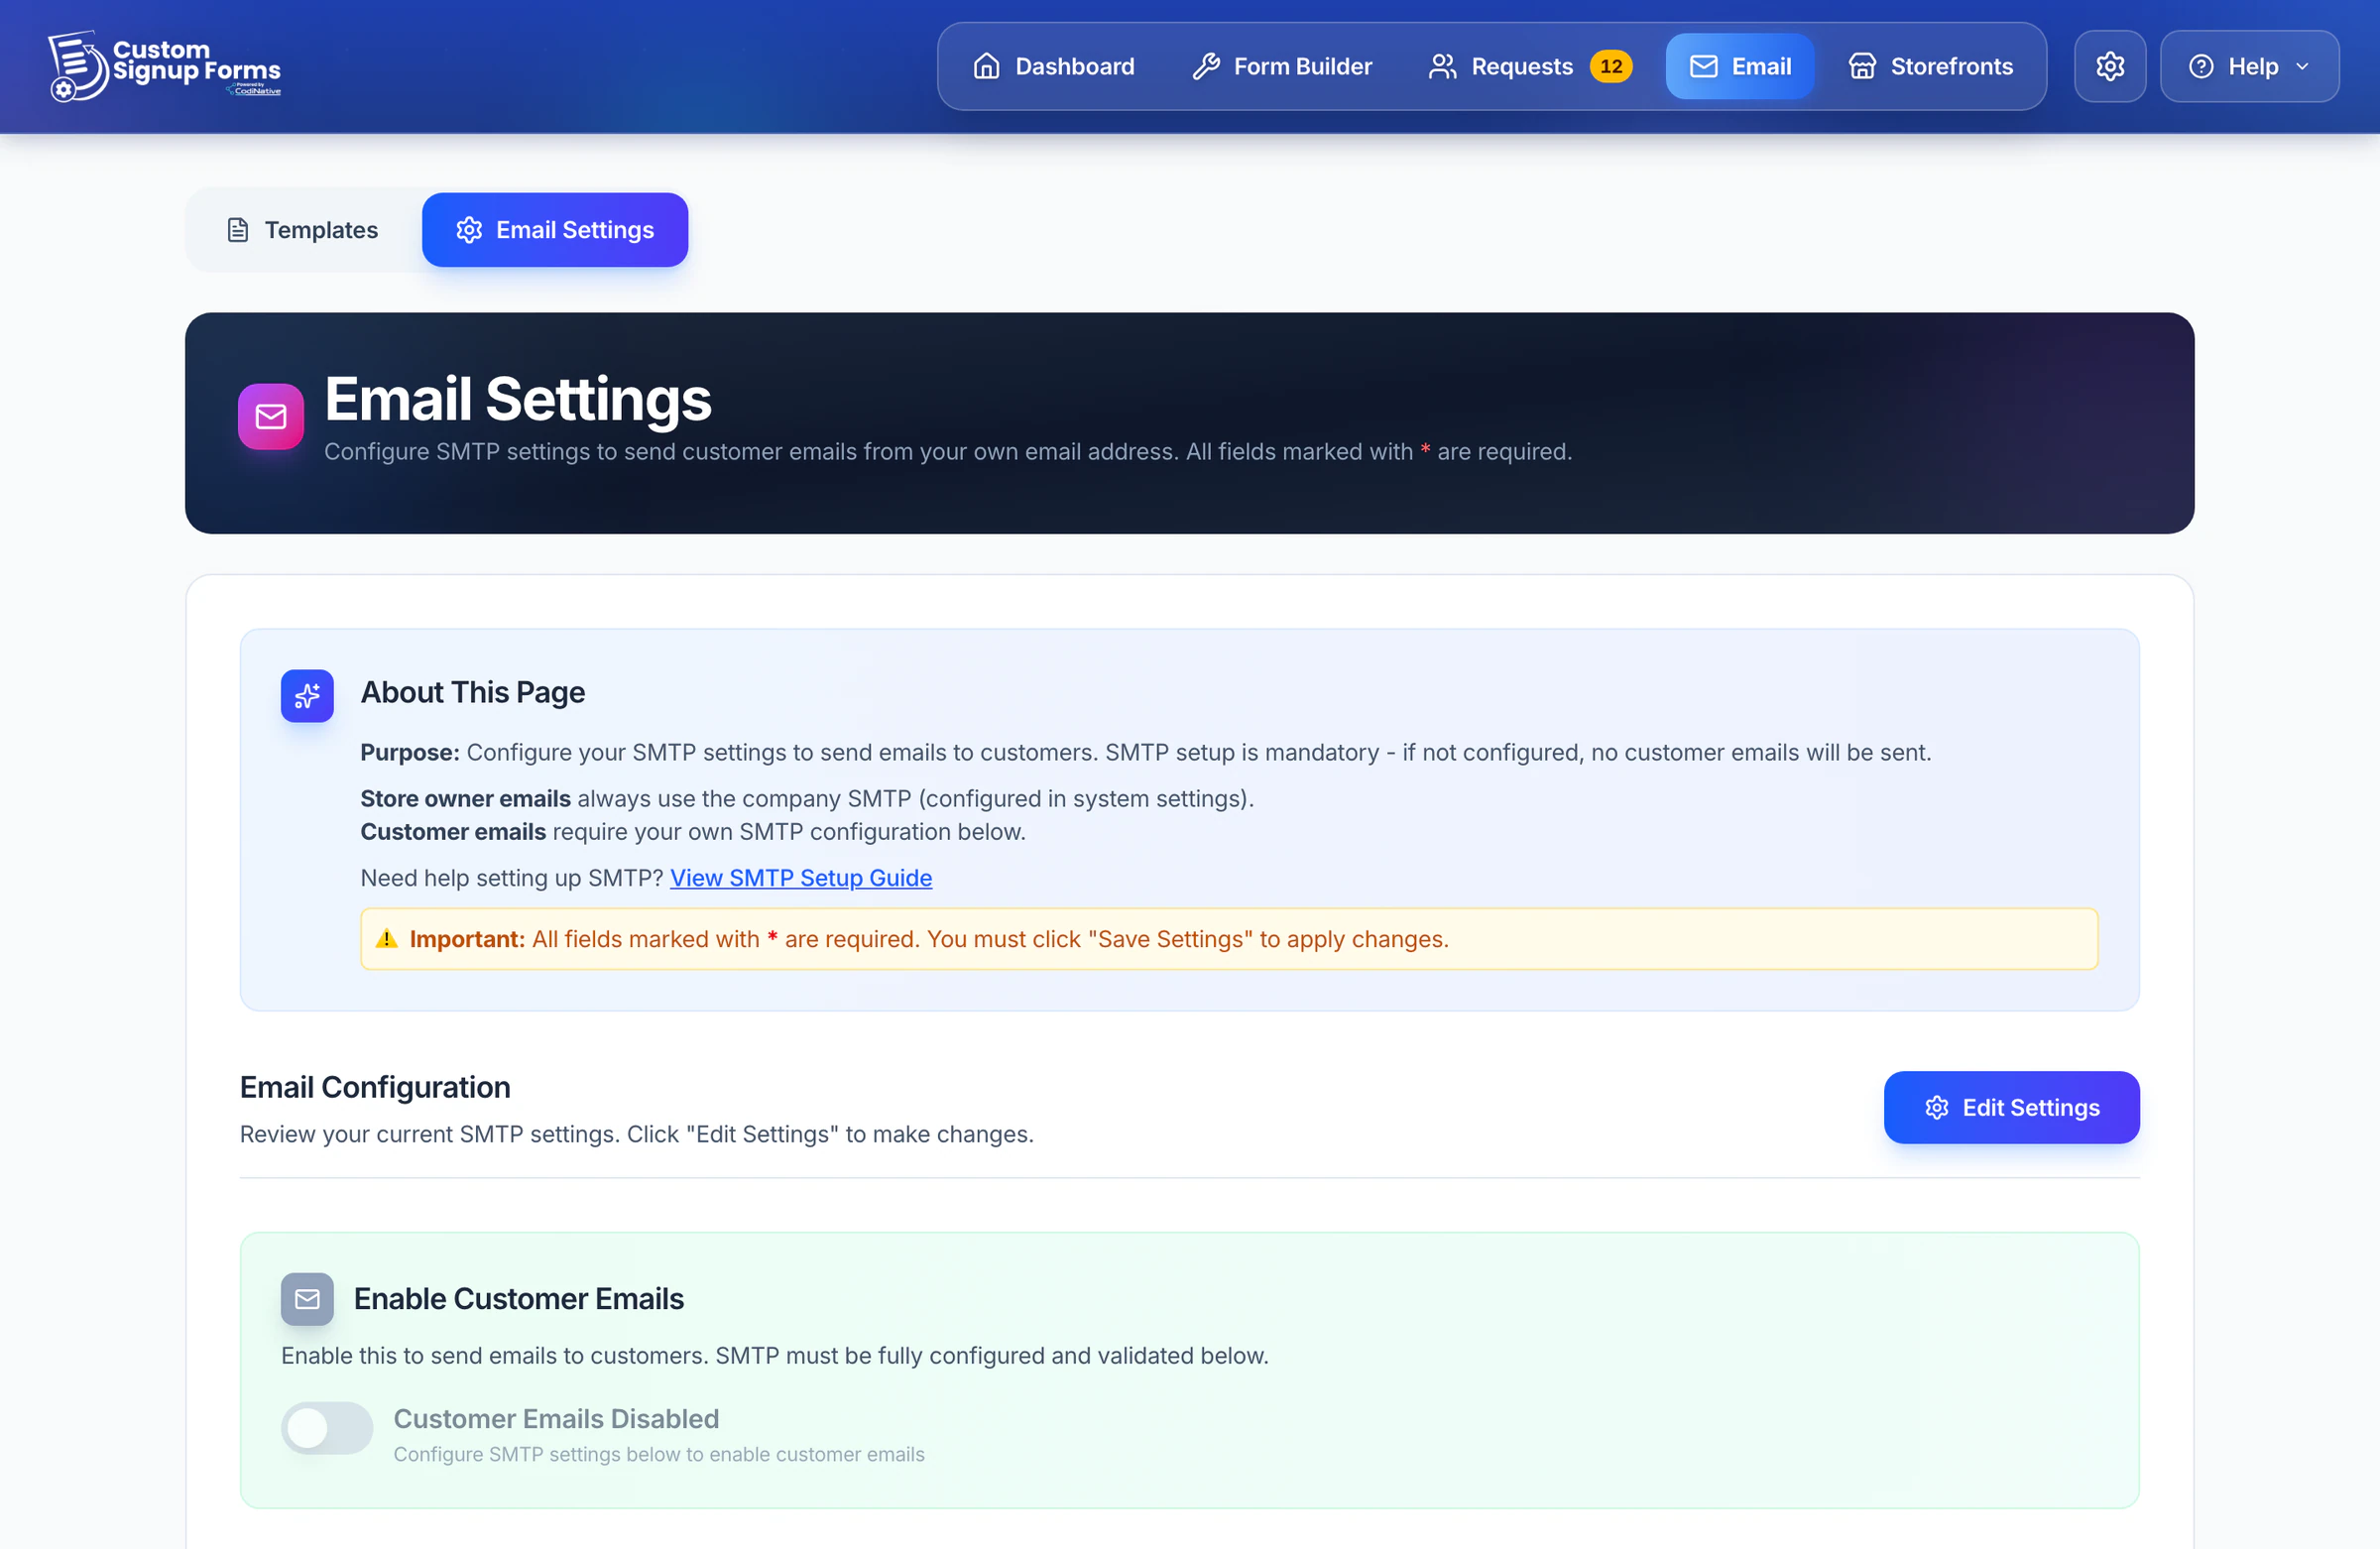
- Click Edit Settings.
- Under Sender Information, enter the From Email (on your own domain), From Name, Reply-To and, if you like, a Store Display Name.
- Under SMTP Configuration, enter your provider's host, port (587 or 465), username and password, then click Save Settings.
- Switch on Enable Customer Emails.
Email and SMTP Setup has the values for common providers. Notifications to your own team don't need SMTP: Codinative sends them.
The five templates
In the app: Email → Templates
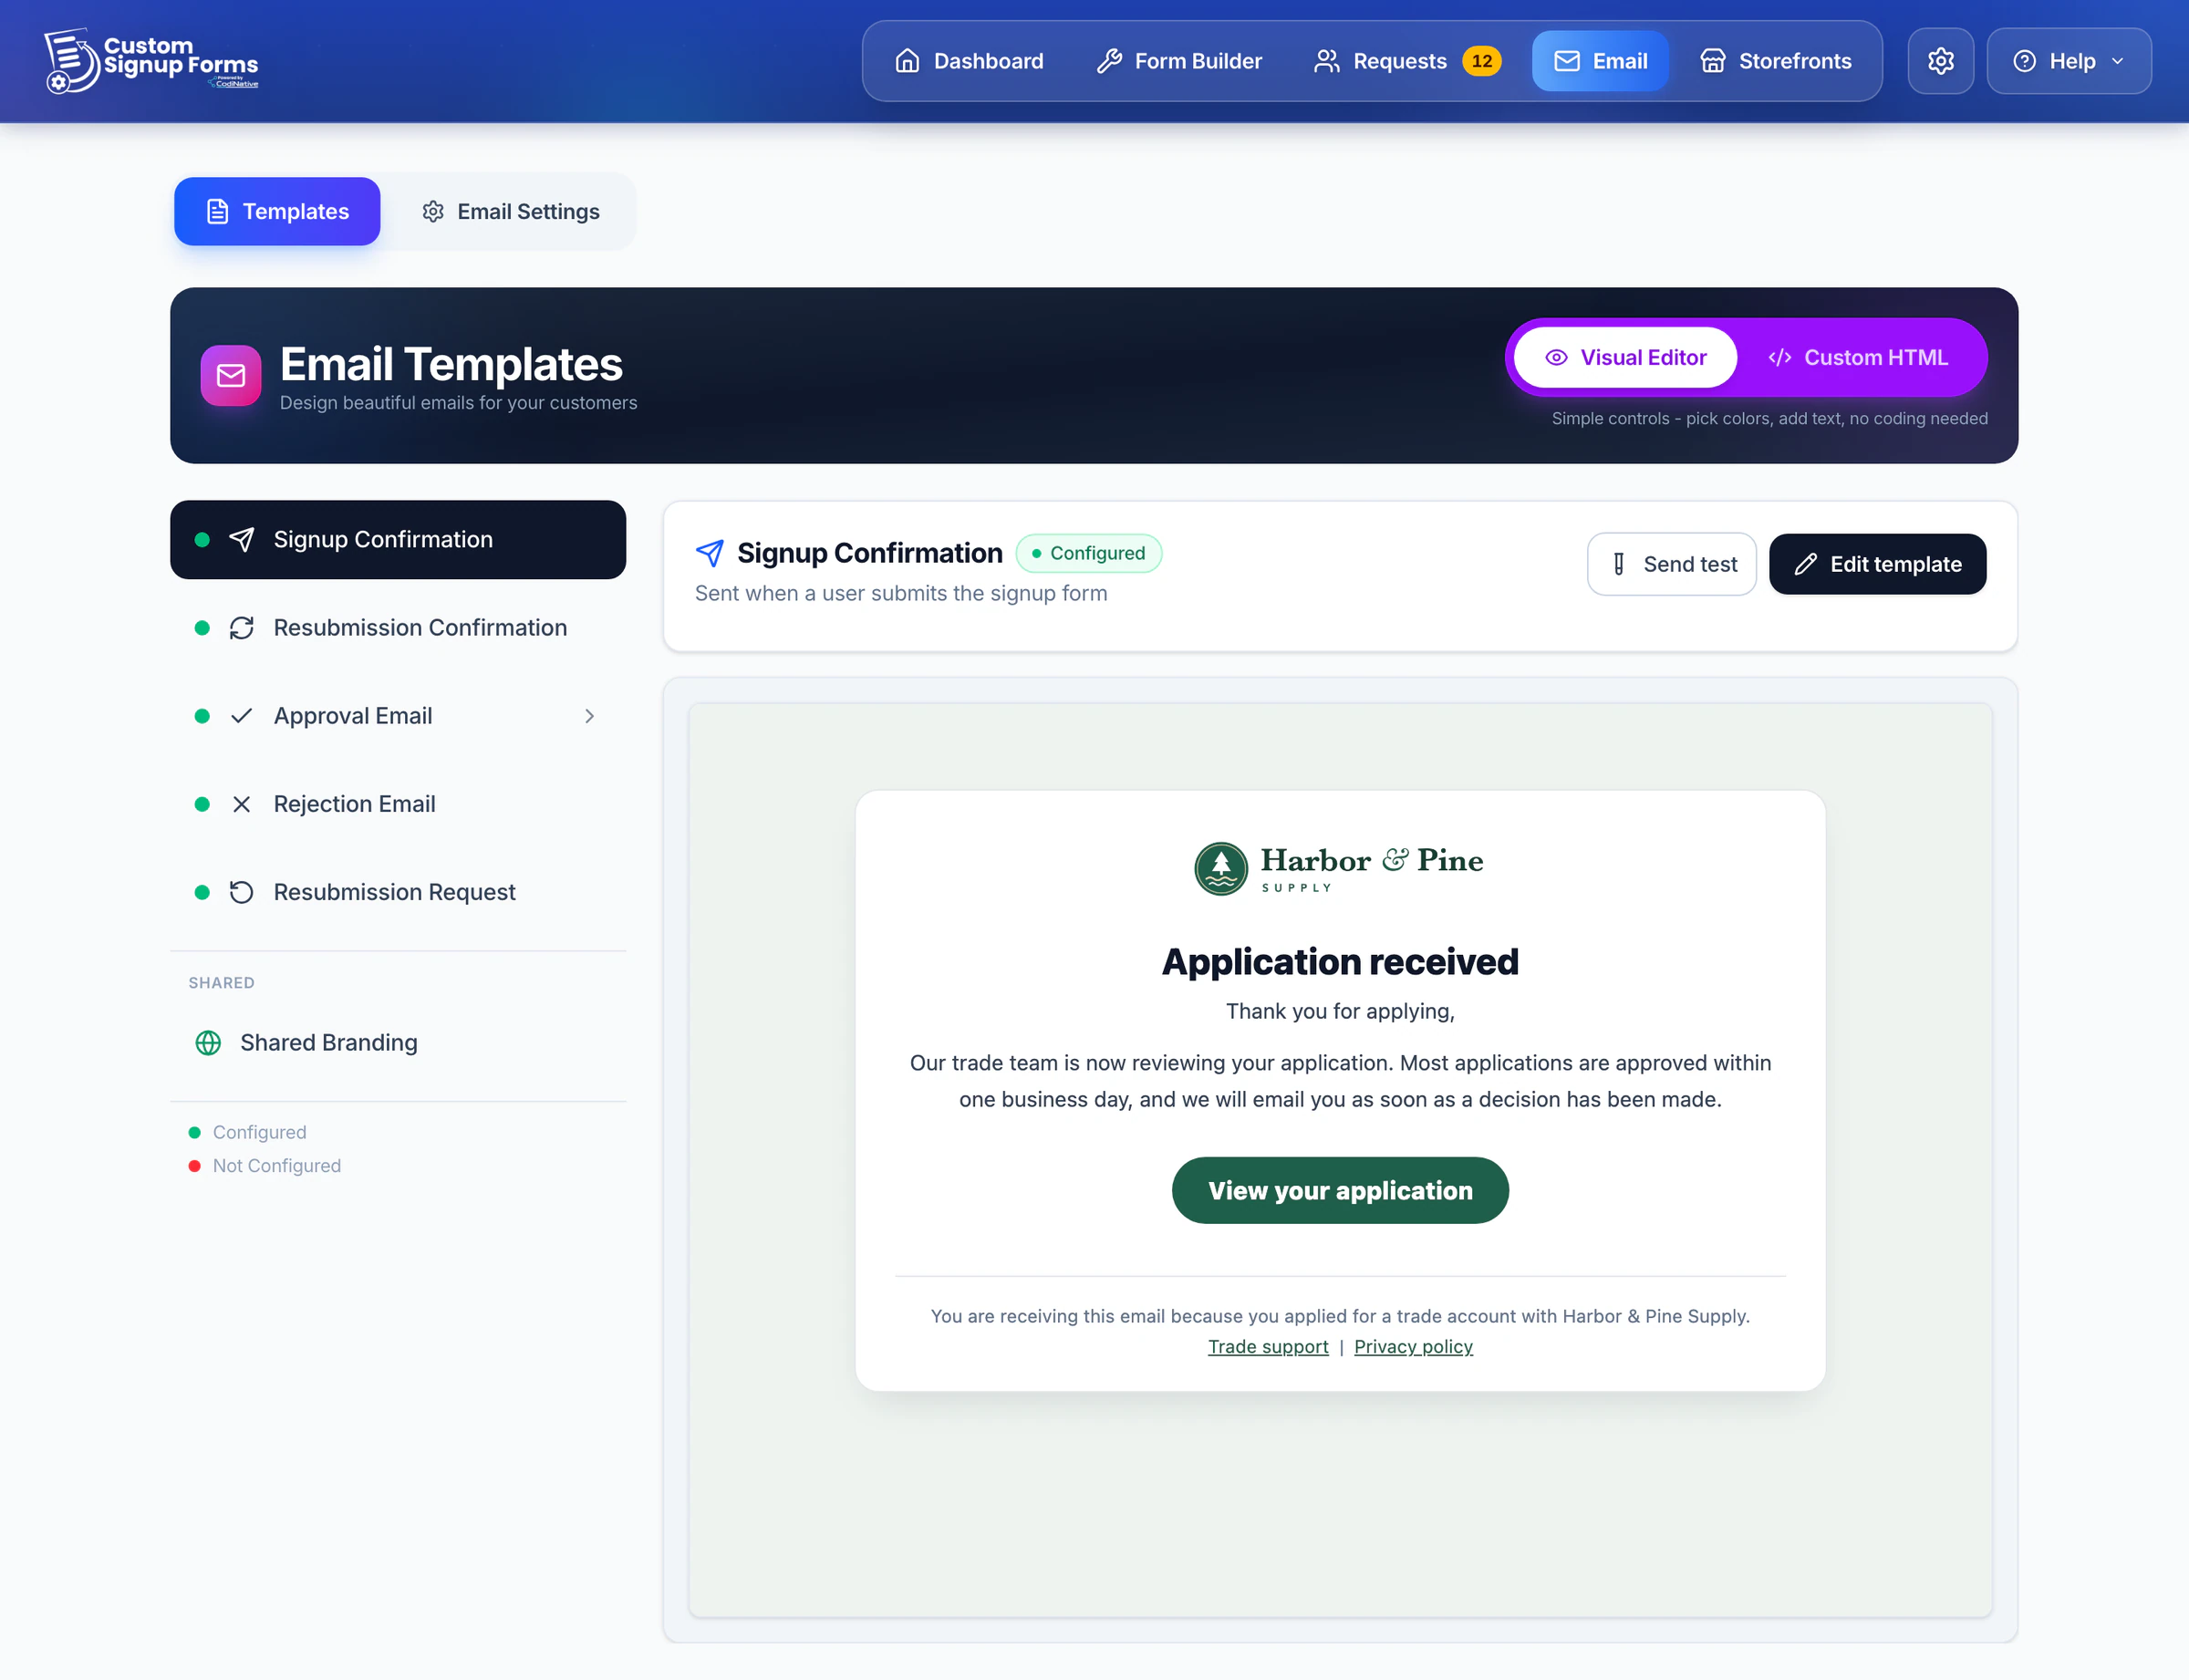
- Signup Confirmation - sent when a shopper submits the form.
- Resubmission Confirmation - sent when a shopper resubmits after corrections.
- Approval Email - sent when you approve a request.
- Rejection Email - sent when you reject a request.
- Resubmission Request - sent when you ask for corrections.
Shared Branding holds the logo, a banner image and your social links for every template. Use Send test to email a template to yourself before going live.
Edit a template
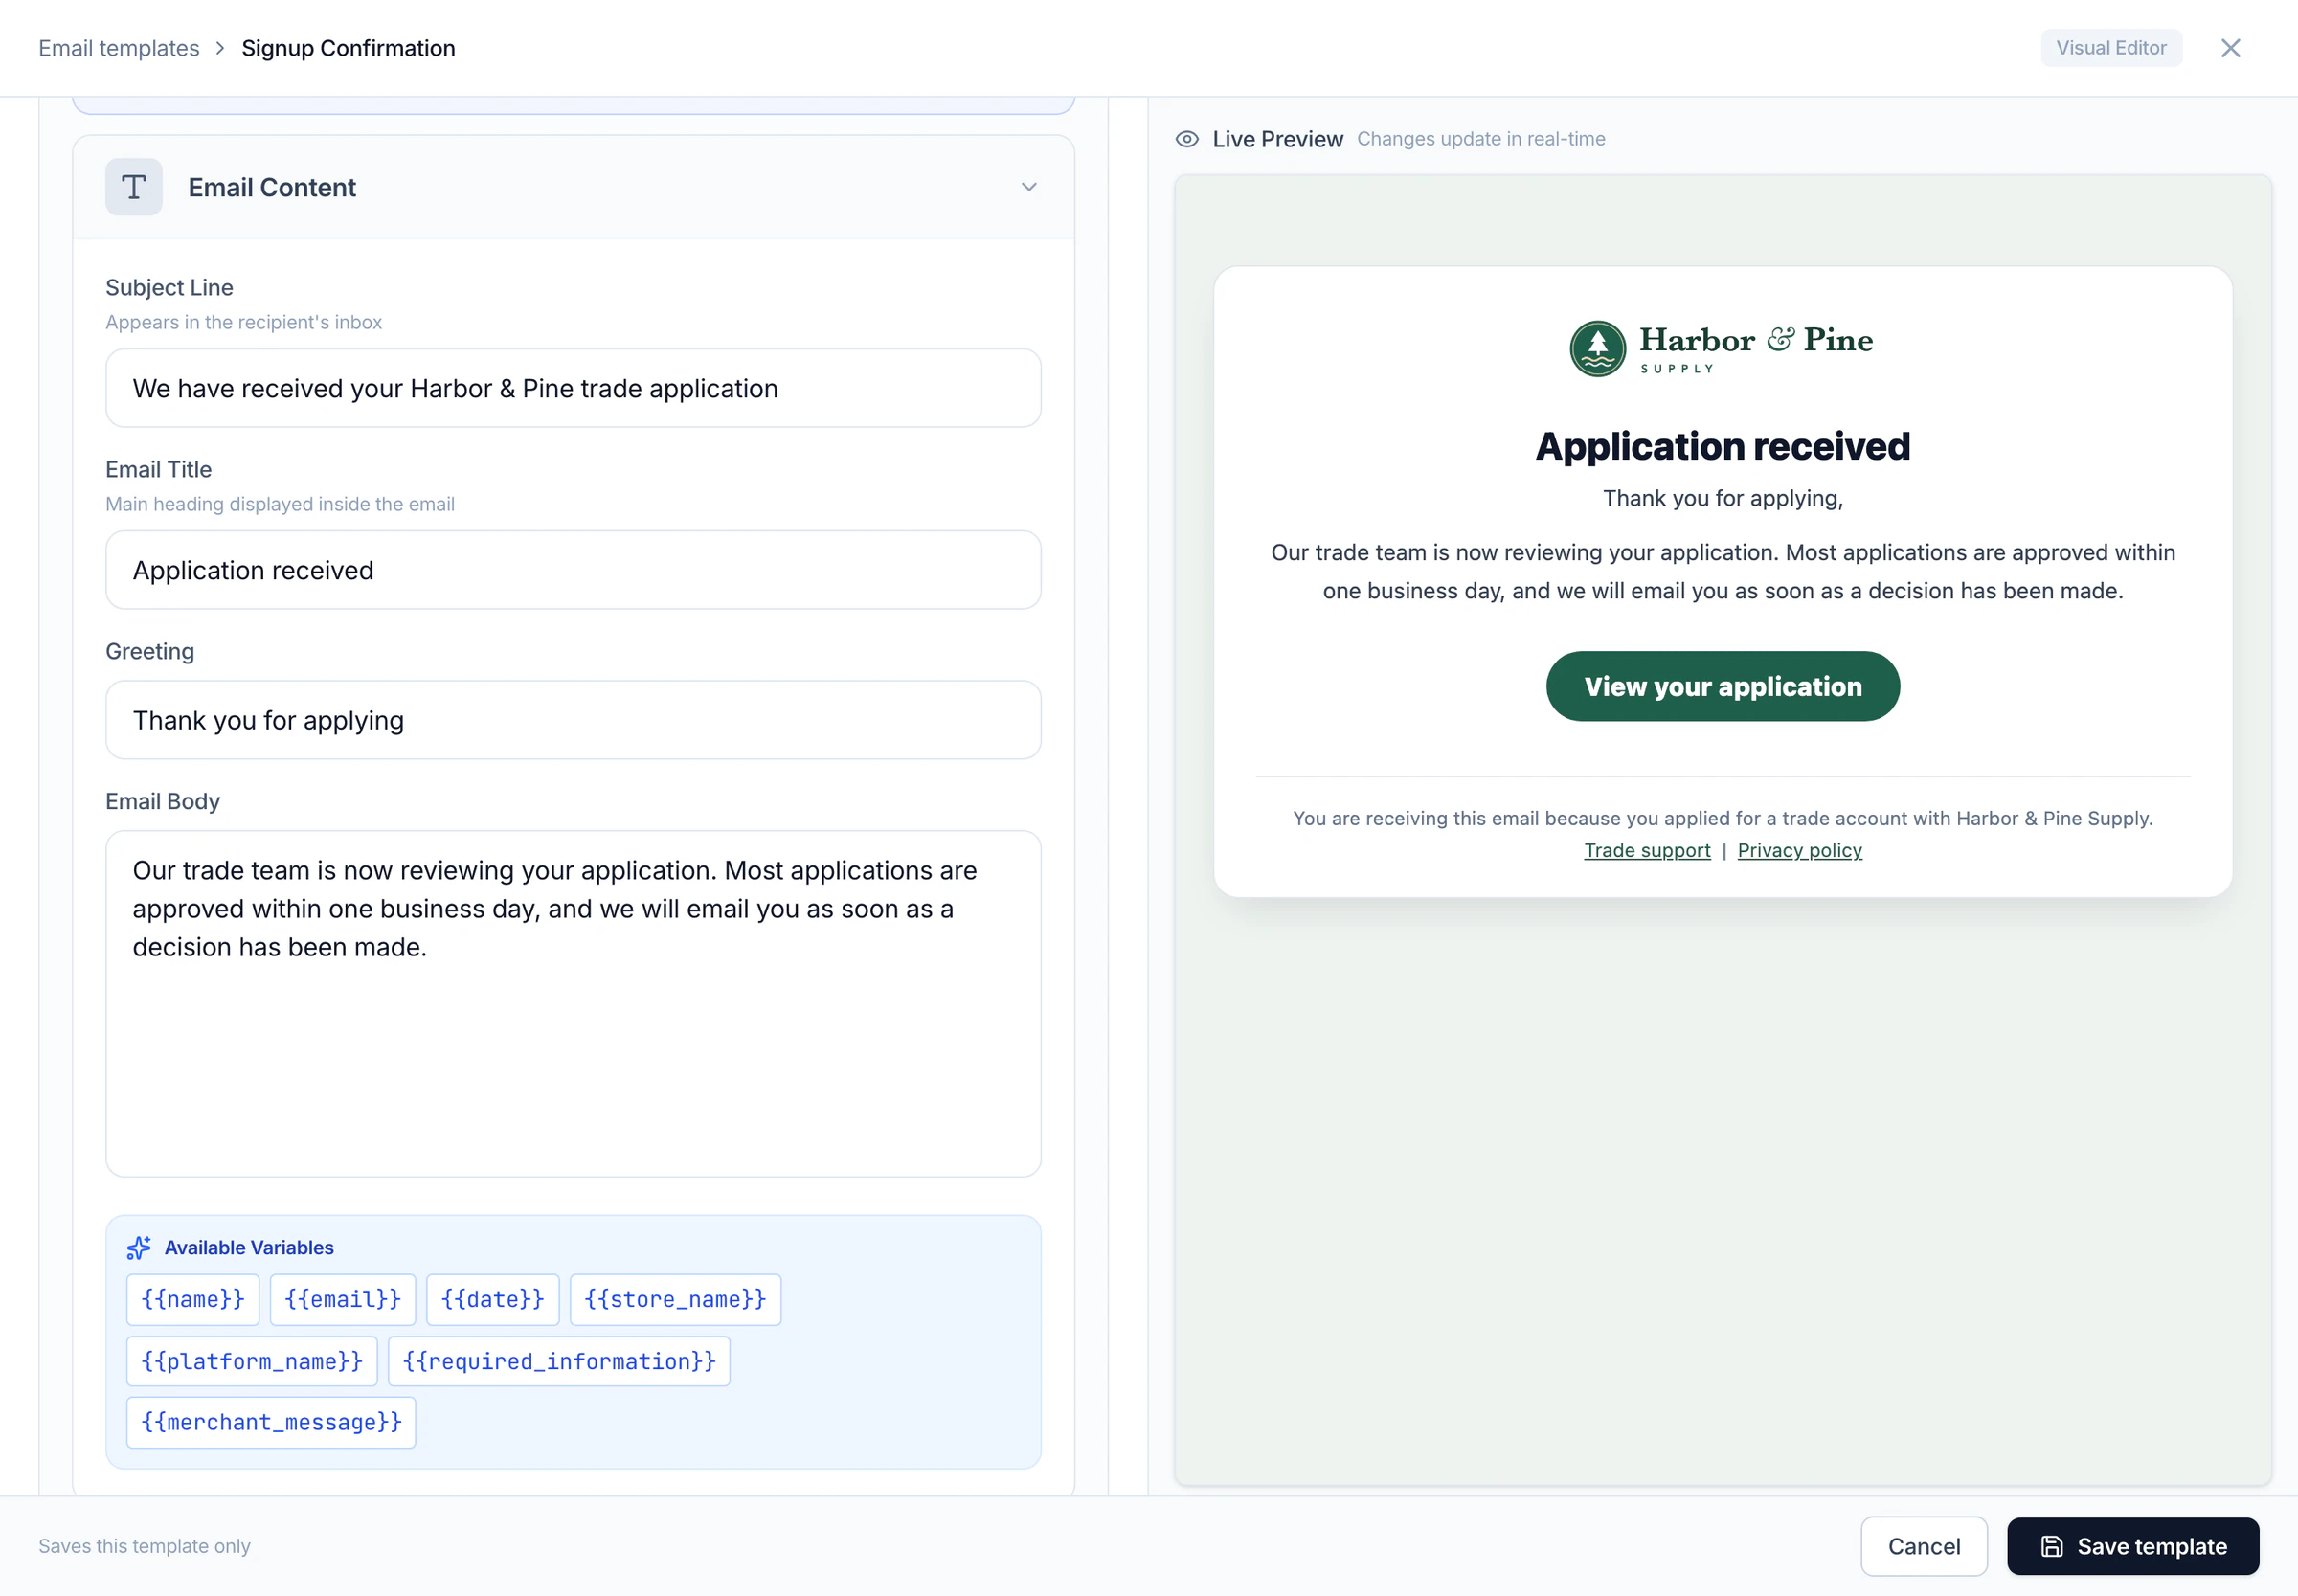
- Pick the template and click Edit template.
- In Email Content, write the subject line, title, greeting and body.
- Adjust Branding & Colors, Call-to-Action Buttons (give each button its URL) and Footer & Links.
- Click Save template.
Prefer your own markup? Switch from Visual Editor to Custom HTML at the top of the page; each mode keeps its own version. Placeholders fill in the details of each applicant: {{name}}, {{email}}, {{date}}, {{store_name}}, {{platform_name}}, {{required_information}}, {{merchant_message}}.
- Per customer group - the Approval Email can have a version for each BigCommerce customer group.
- Per answer - when your form has a field with conditional logic, a template can have a version for each answer to it.
Set up every template before your form goes live, so each email says what you want.
Turn an email on or off
In the app: Settings → Email Sending
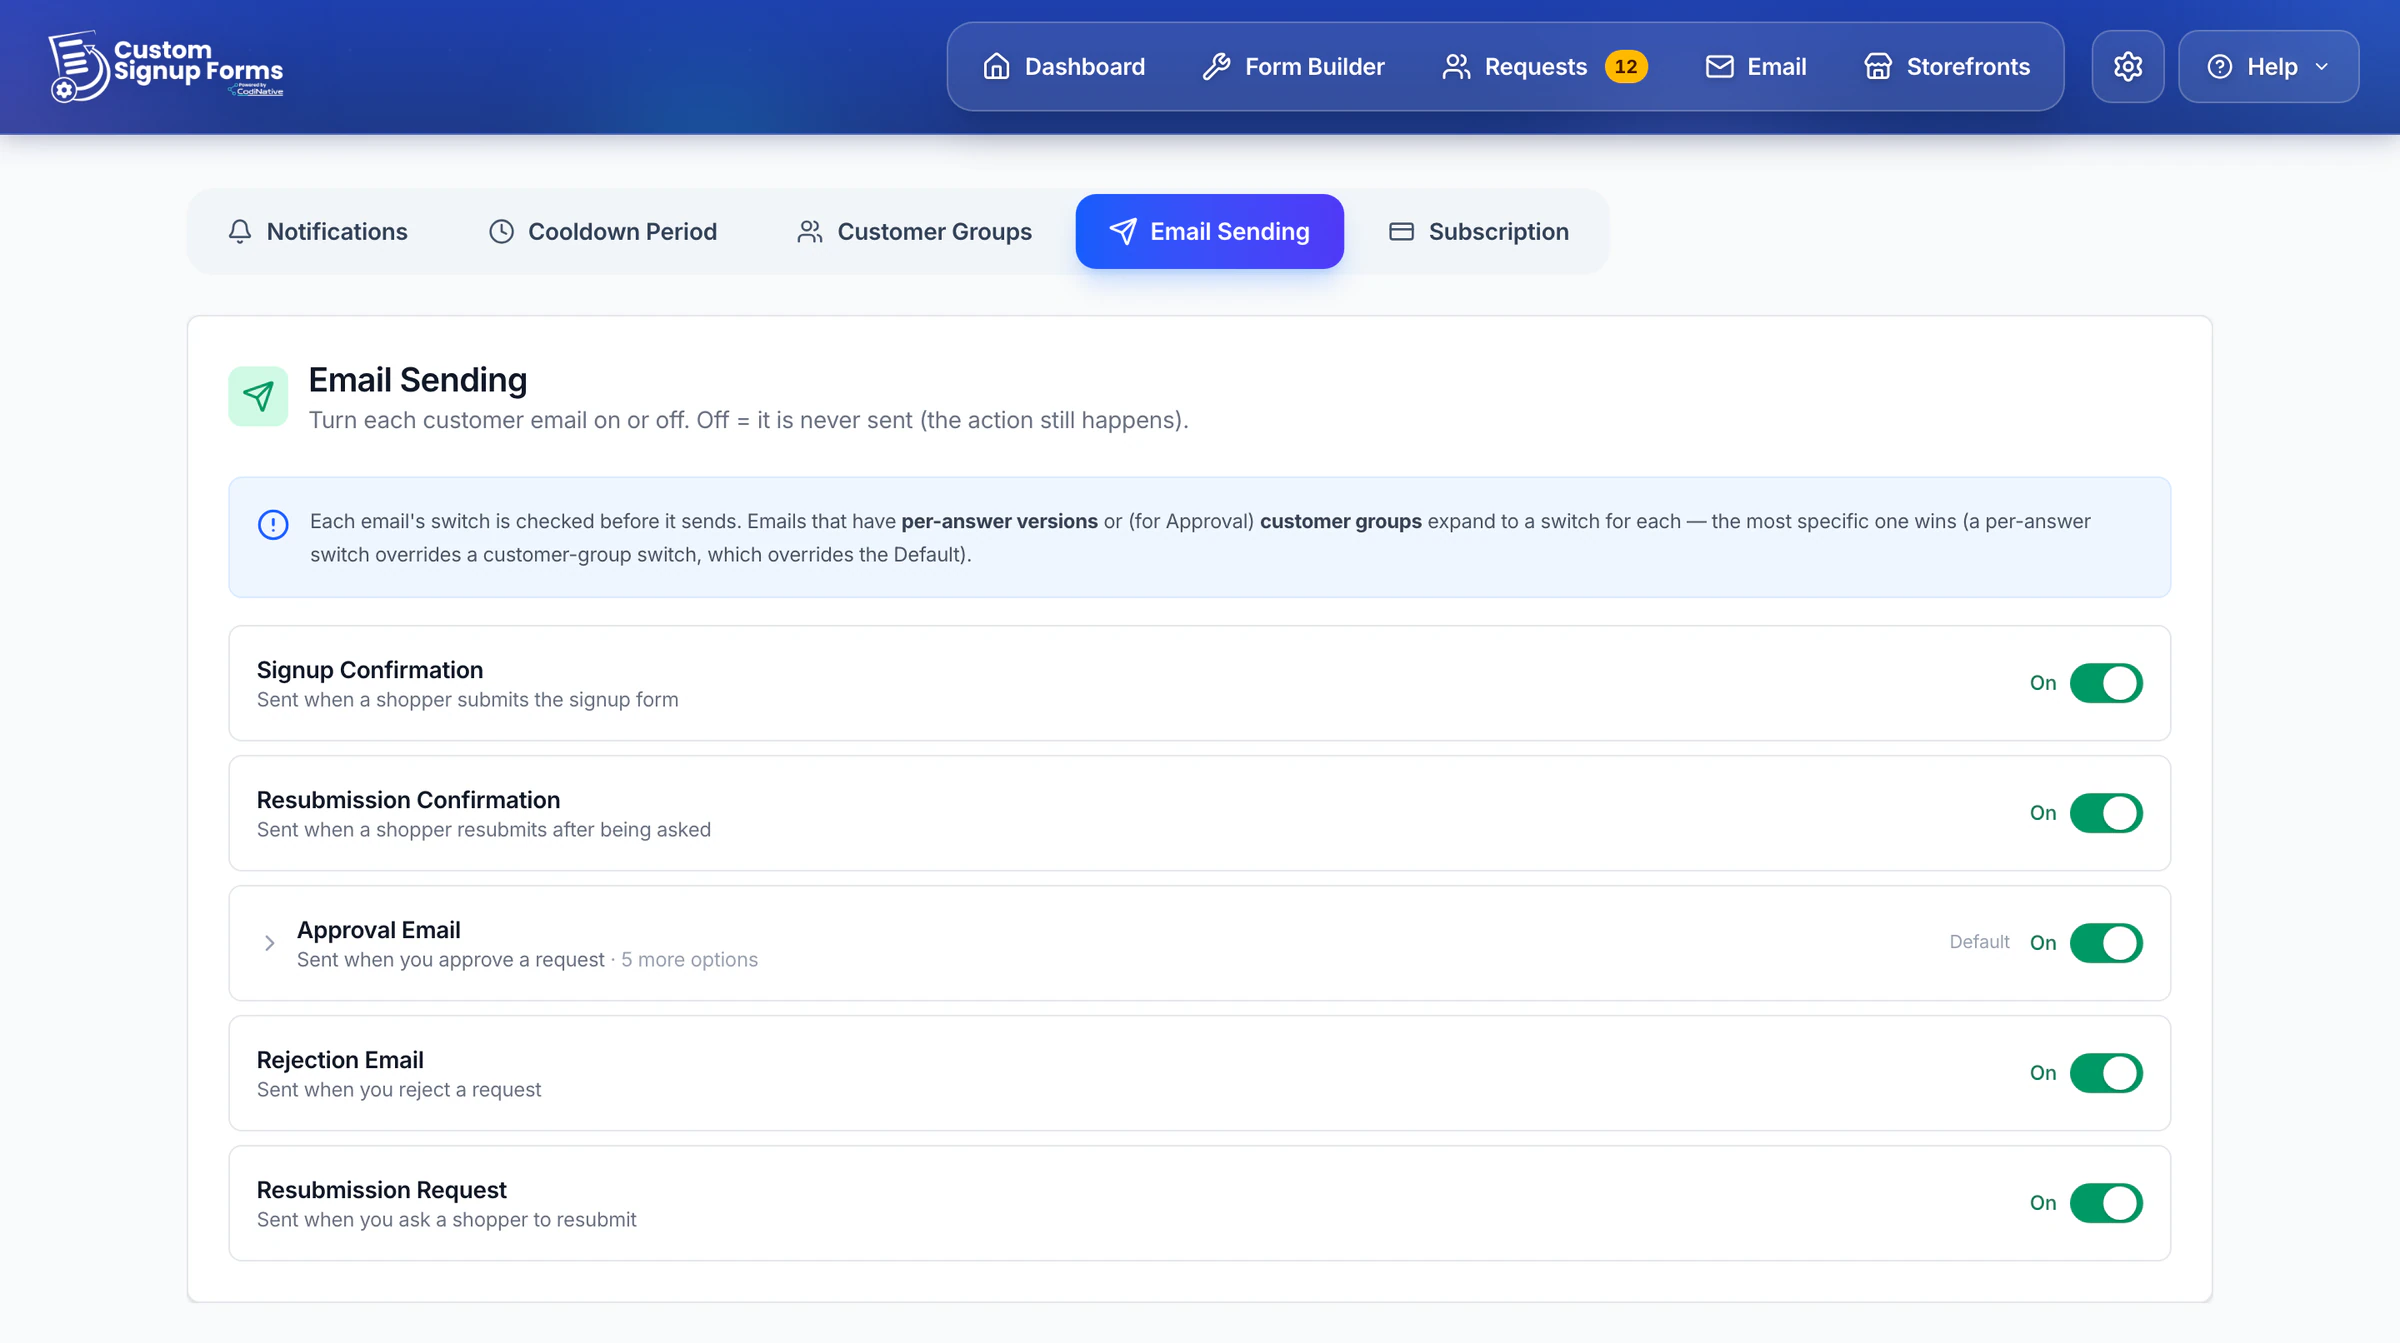
Every email is on by default. Switch one off and it is never sent, while the action itself (approving, for example) still happens.
Multi-storefront
Serve a different signup form on each storefront, each with its own emails and approval settings. Multi-storefront is part of the Pro plan (up to 3 storefronts) and Enterprise (4 or more).
Turn it on and assign forms
Pro and EnterpriseIn the app: Storefronts
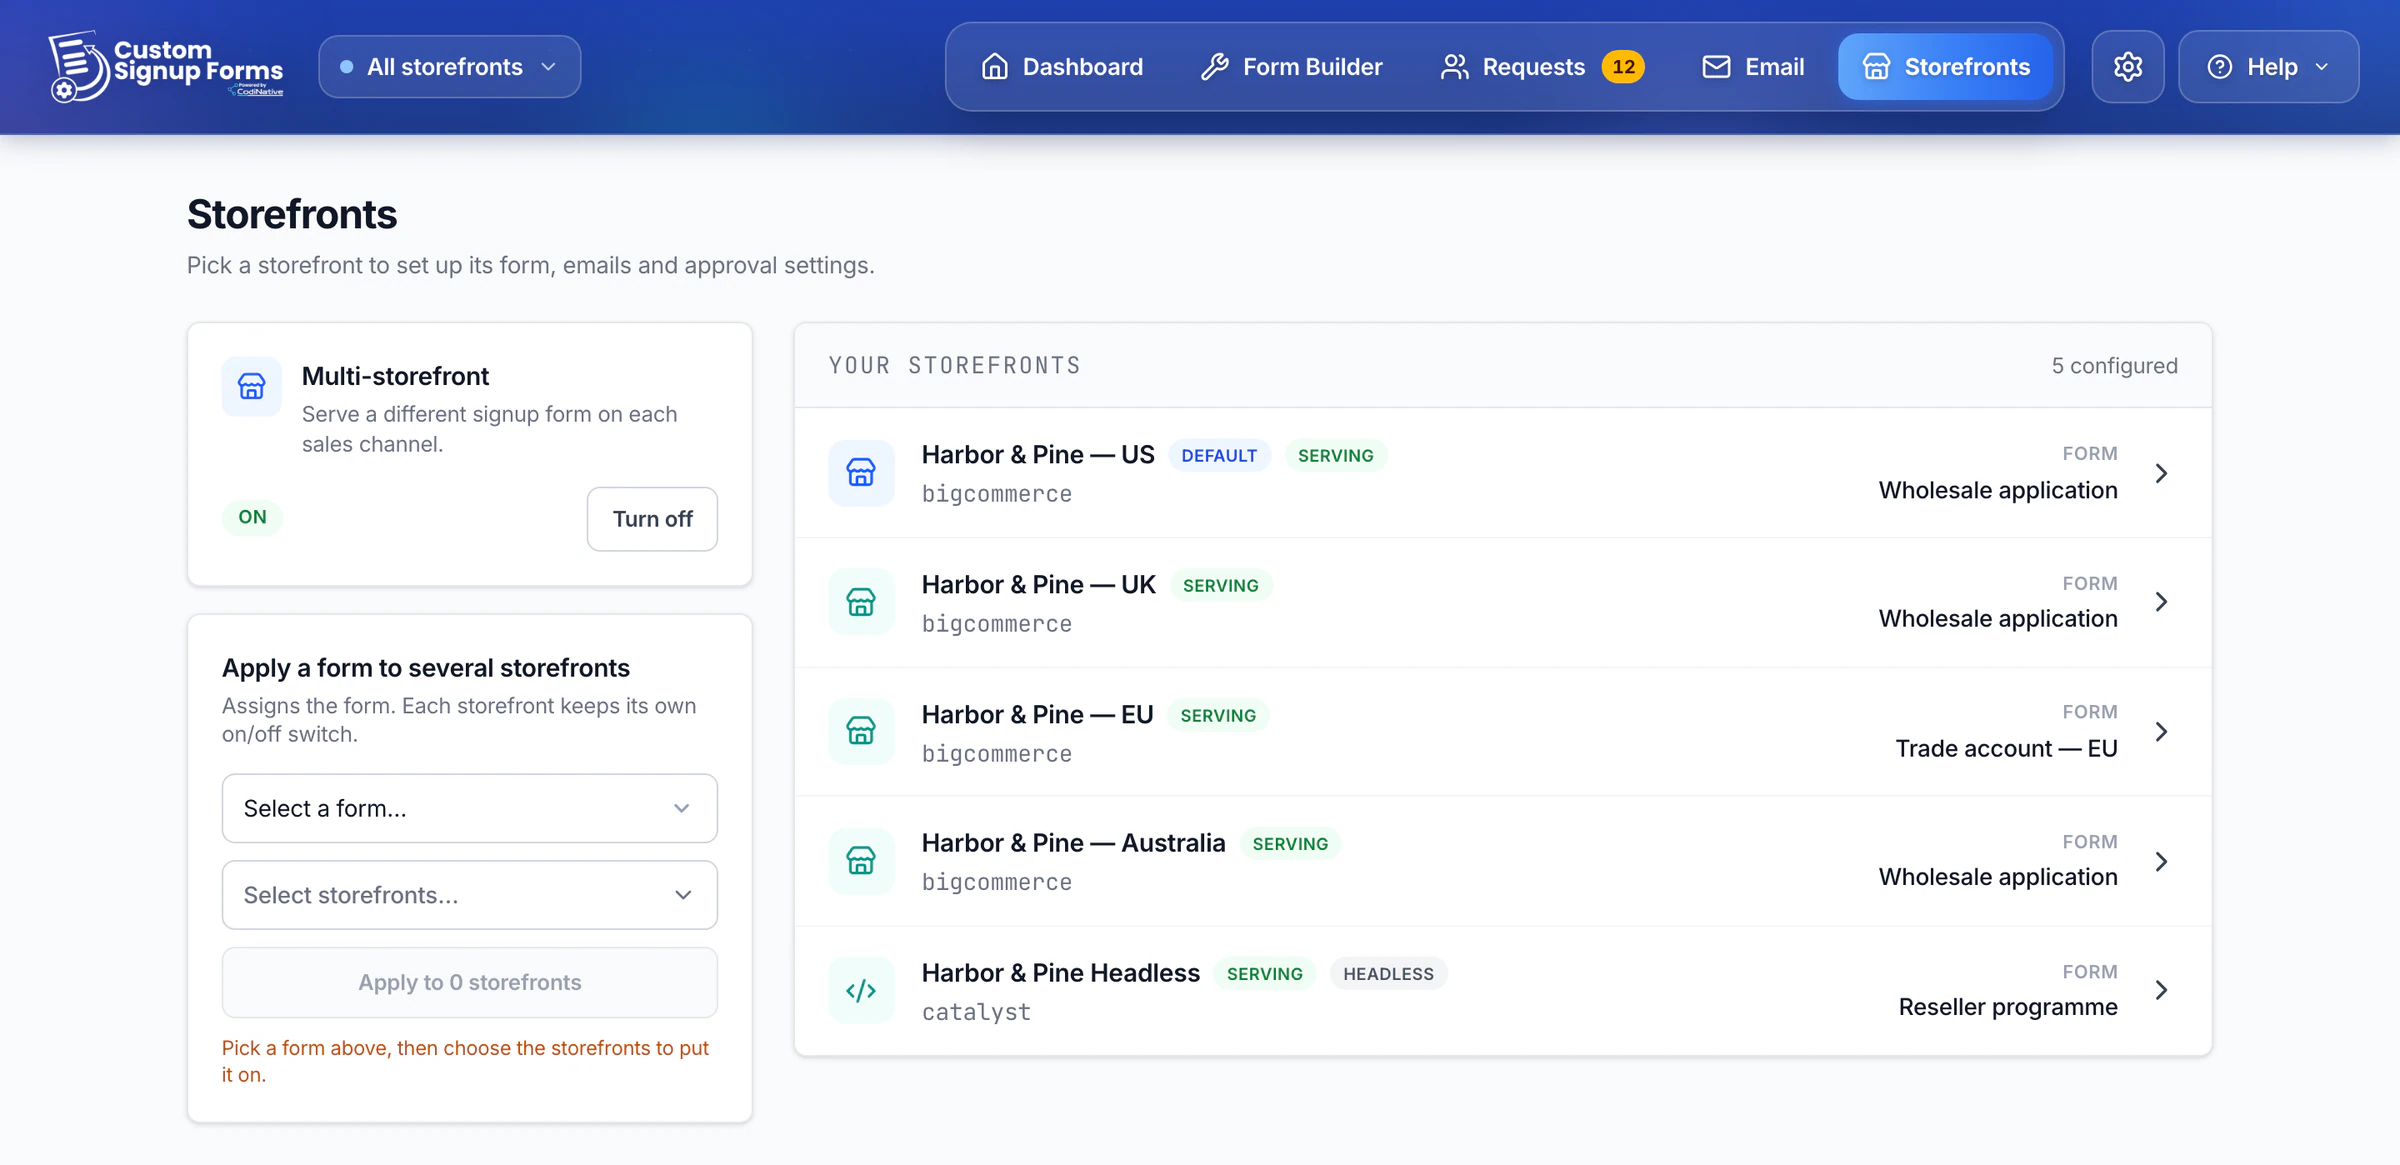
- Click Enable multi-storefront. Your default storefront keeps its form.
- Click a storefront to open it, choose its form under Signup form and click Assign.
- Switch Serving on. On a standard storefront the app installs the form's script for you.
To give several storefronts the same form, use Apply a form to several storefronts: pick the form and the storefronts, then click Apply to … storefronts. Each storefront keeps its own serving switch. Forms are shared, so you still build and edit them in the Form Builder.
One storefront at a time
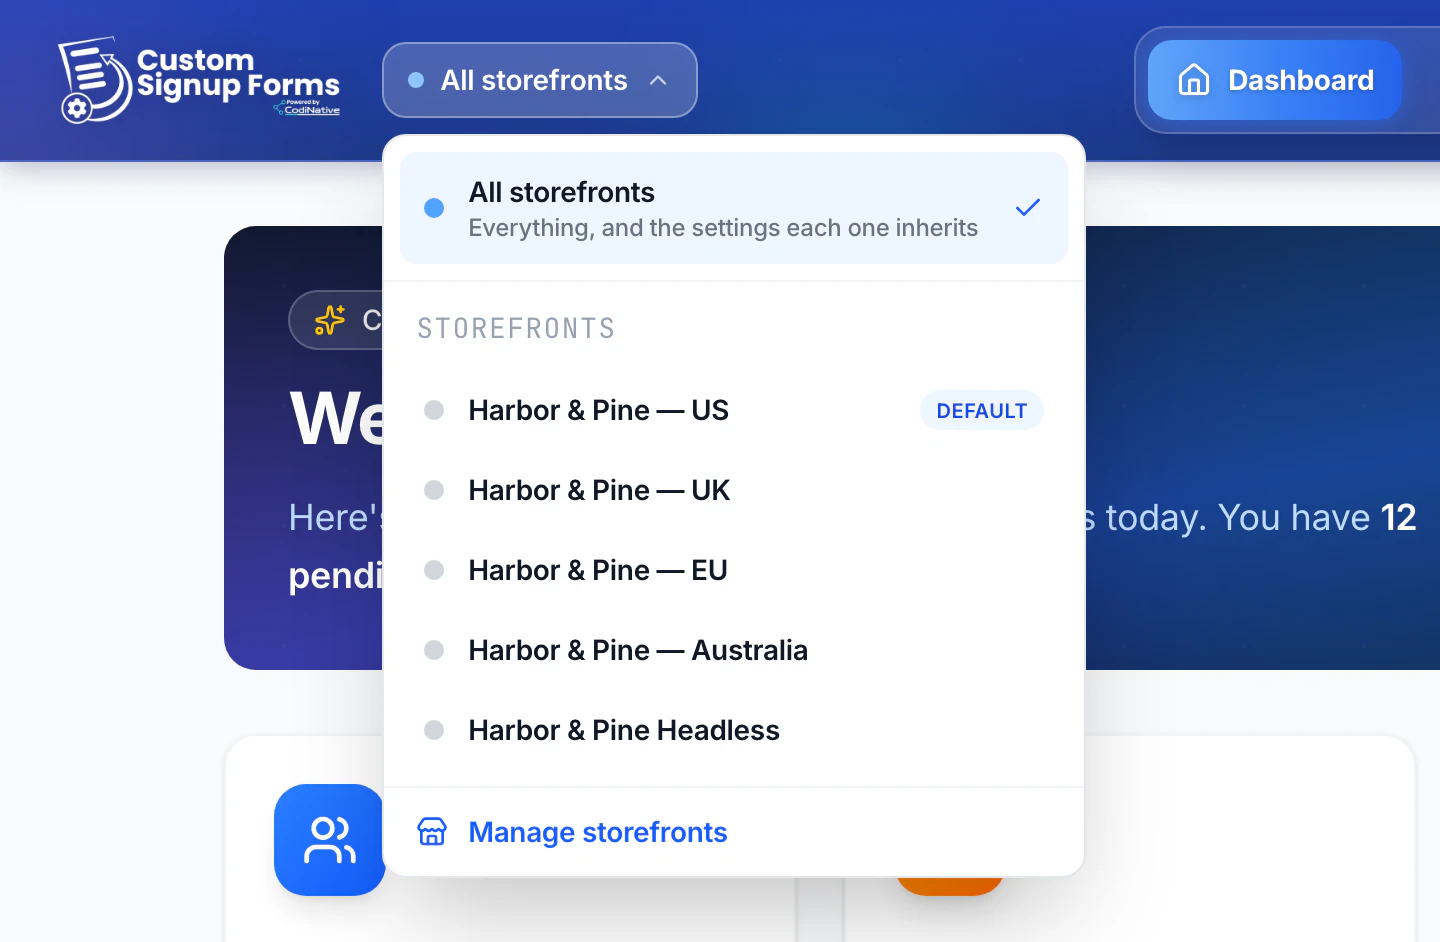
Use the switcher in the header to work on All storefronts or a single one. On the Dashboard and Requests it filters what you see. On Email and Settings it chooses what you are editing: a banner shows Editing the defaults or the storefront's name. Tick Override on a setting to give that storefront its own value; everything else is inherited from the defaults. You can override the email templates and branding, the email settings and switches, notifications, the cooldown period and the customer group rule.
The storefront page
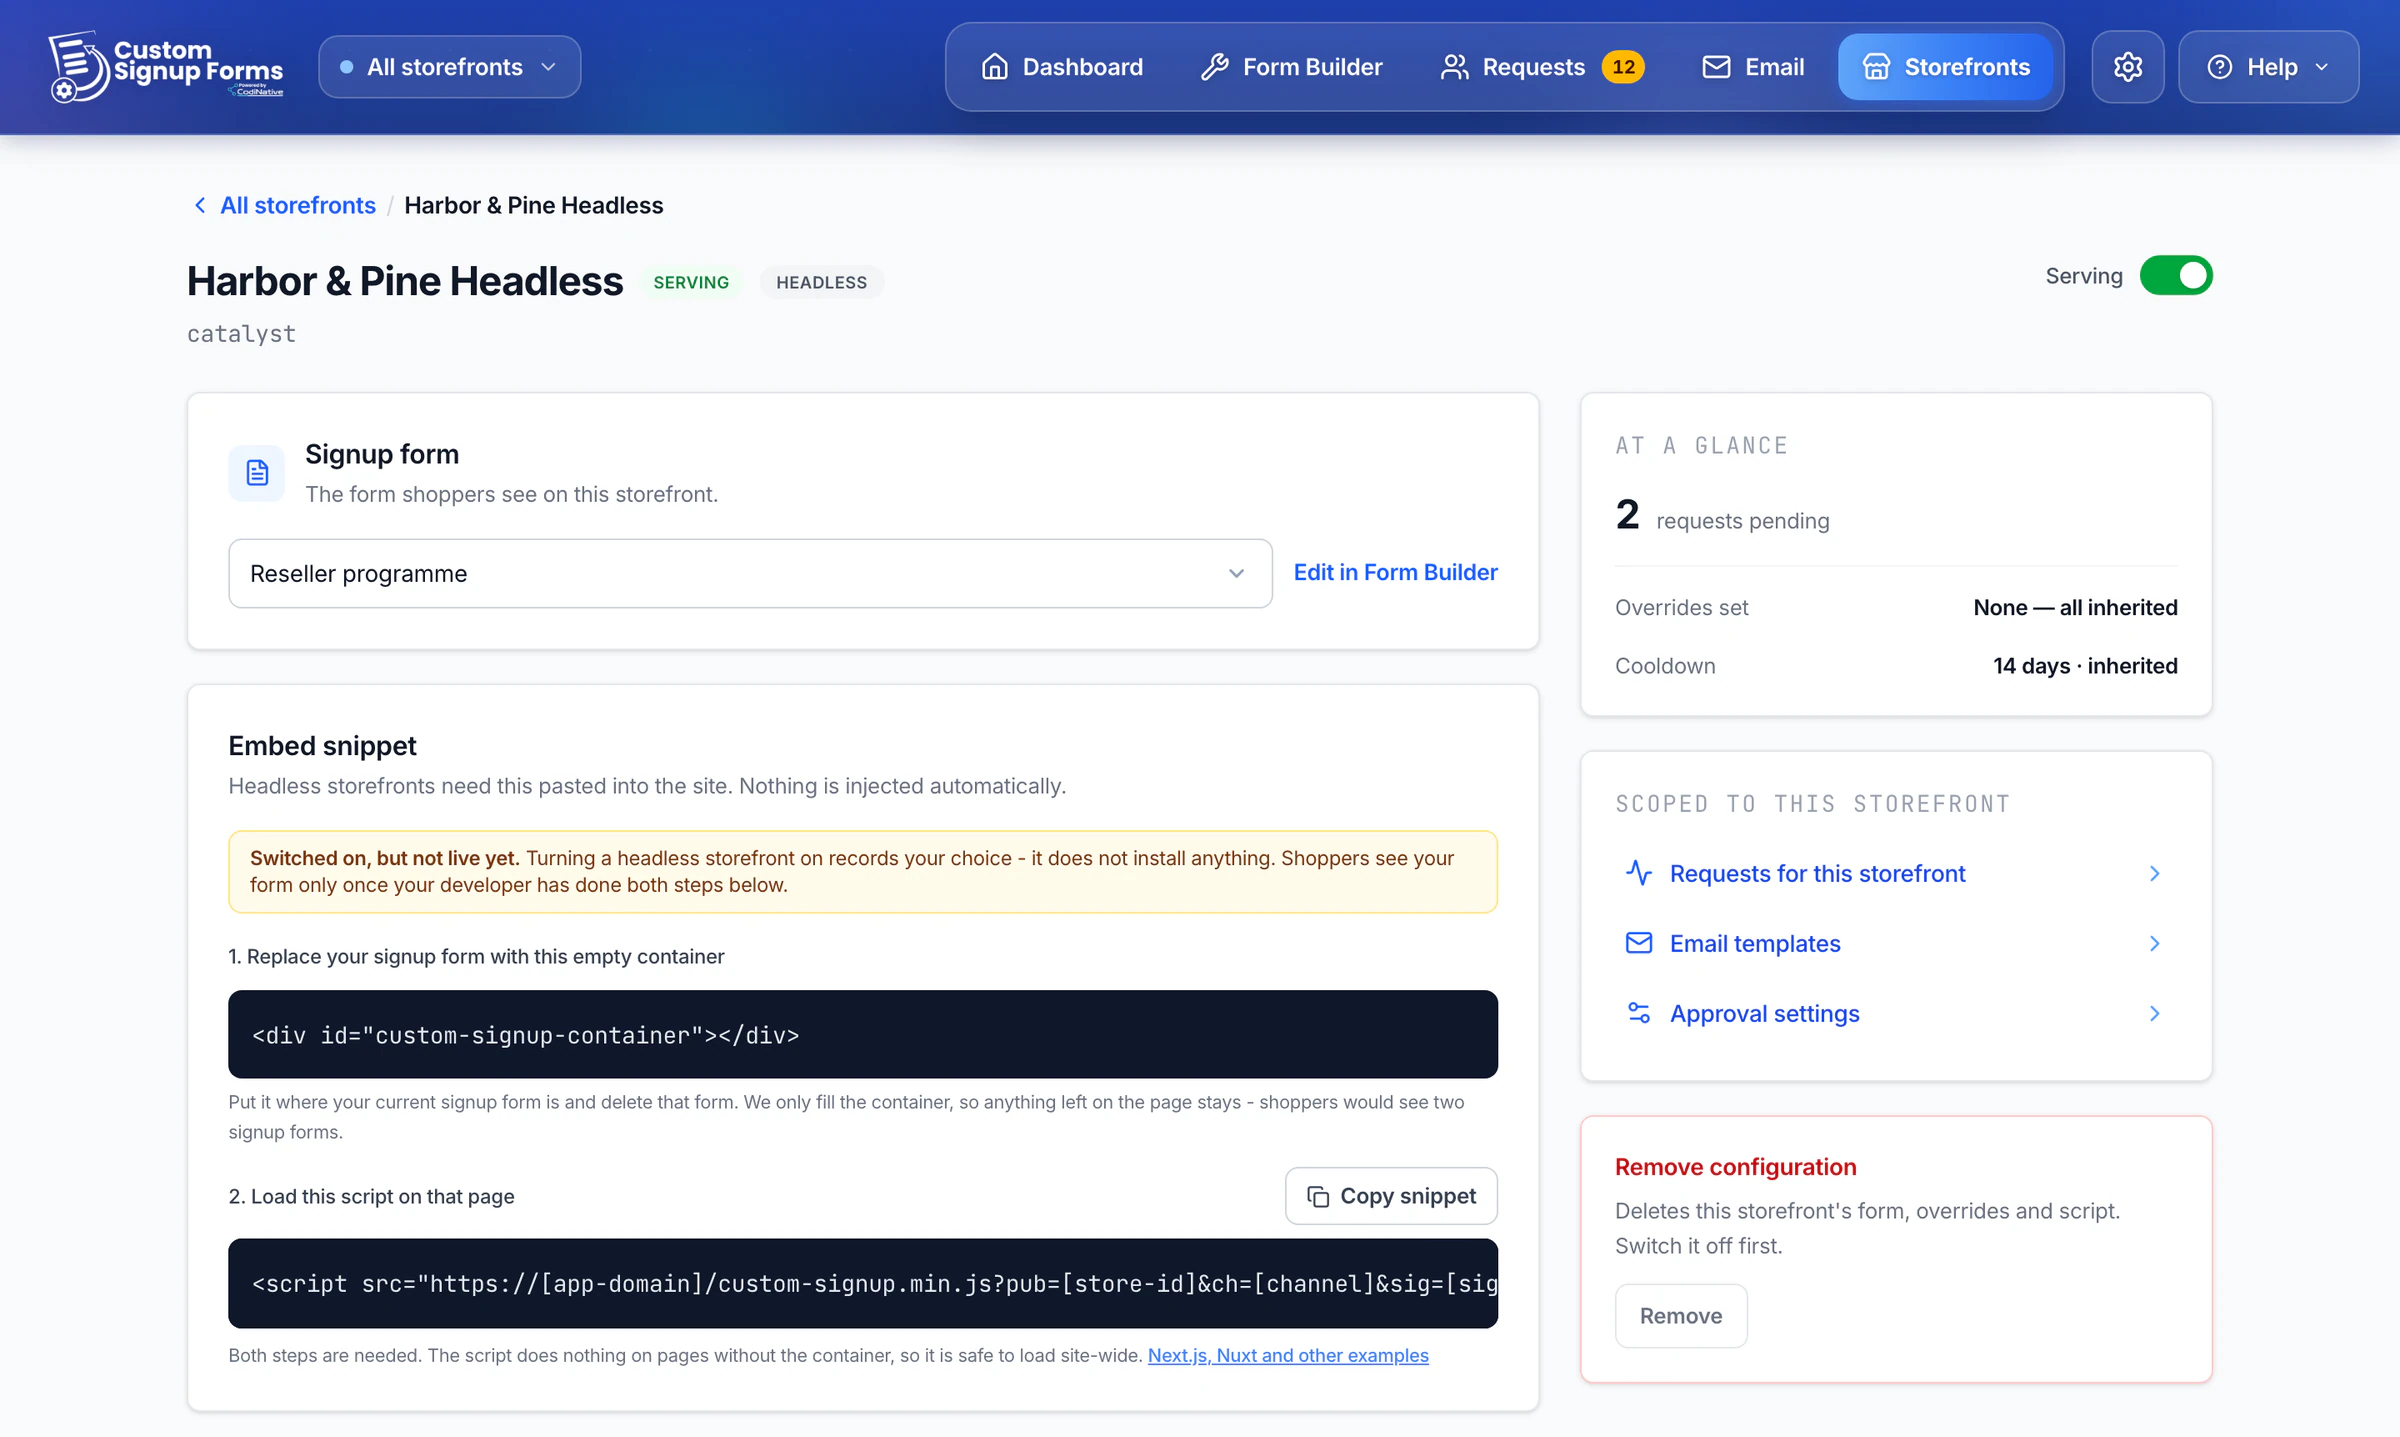
- Signup form - the form this storefront shows, with a link to edit it.
- At a glance - pending requests, overrides and the cooldown in use.
- Scoped to this storefront - its requests, email templates and approval settings.
- BigCommerce customer settings - this storefront's default and guest customer groups, shown when your store allows the app to read them.
- Remove configuration - clears the storefront's form, overrides and script (switch it off first).
A headless storefront (Catalyst, Next.js, Nuxt, React, Angular or any other web framework) gets an Embed snippet instead of an automatic script: an empty container to place where the signup form goes, and a script tag to load on that page. Your developer adds both; see Headless Storefronts. The Multi-storefront Guide covers the setup in more depth.
Settings
Click the gear icon in the header. Settings has five tabs: Notifications, Cooldown Period, Customer Groups, Email Sending (see Customer emails) and Subscription.
Notifications
Standard and upIn the app: Settings → Notifications
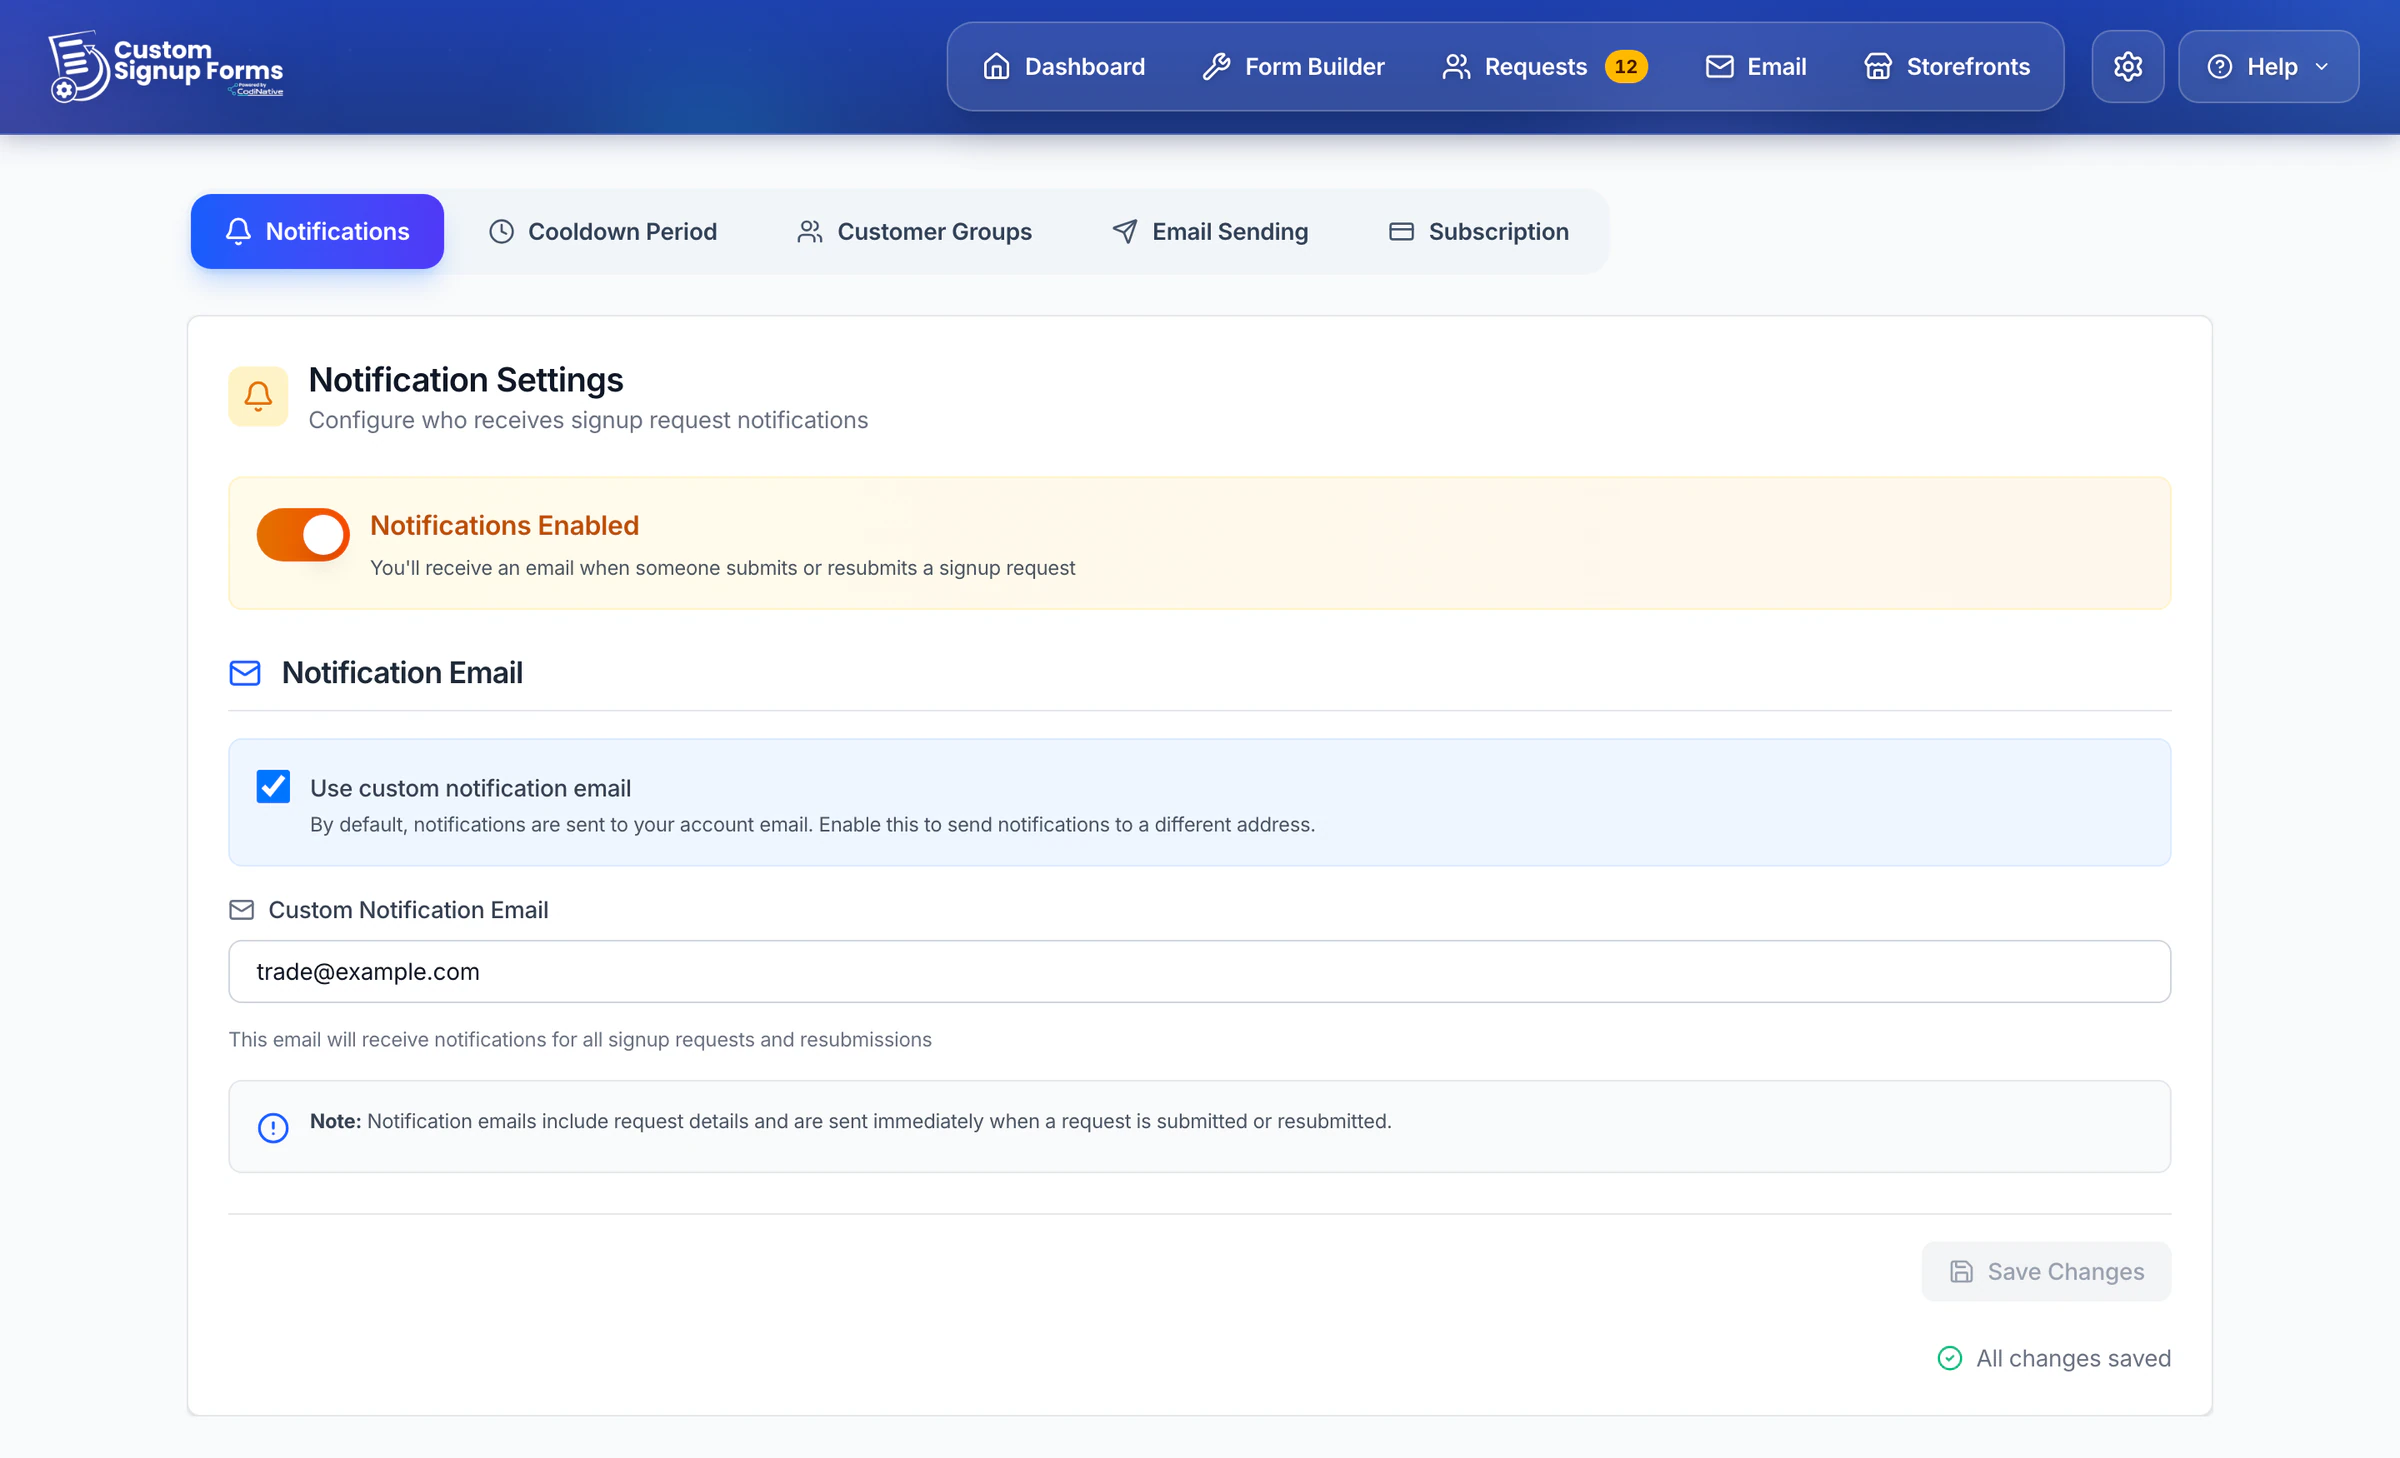
You get an email with the applicant's answers each time someone submits or resubmits the form. It goes to the email address of the account that installed the app; tick Use custom notification email to send it to another address, such as a shared trade inbox.
Cooldown Period
How many days a rejected applicant waits before they can apply again: 1 to 365, 7 by default. On the Free plan it is fixed at 3 days. To let one person apply sooner, use Reset Cooldown on their rejected request.
Customer Groups
Standard and upIn the app: Settings → Customer Groups
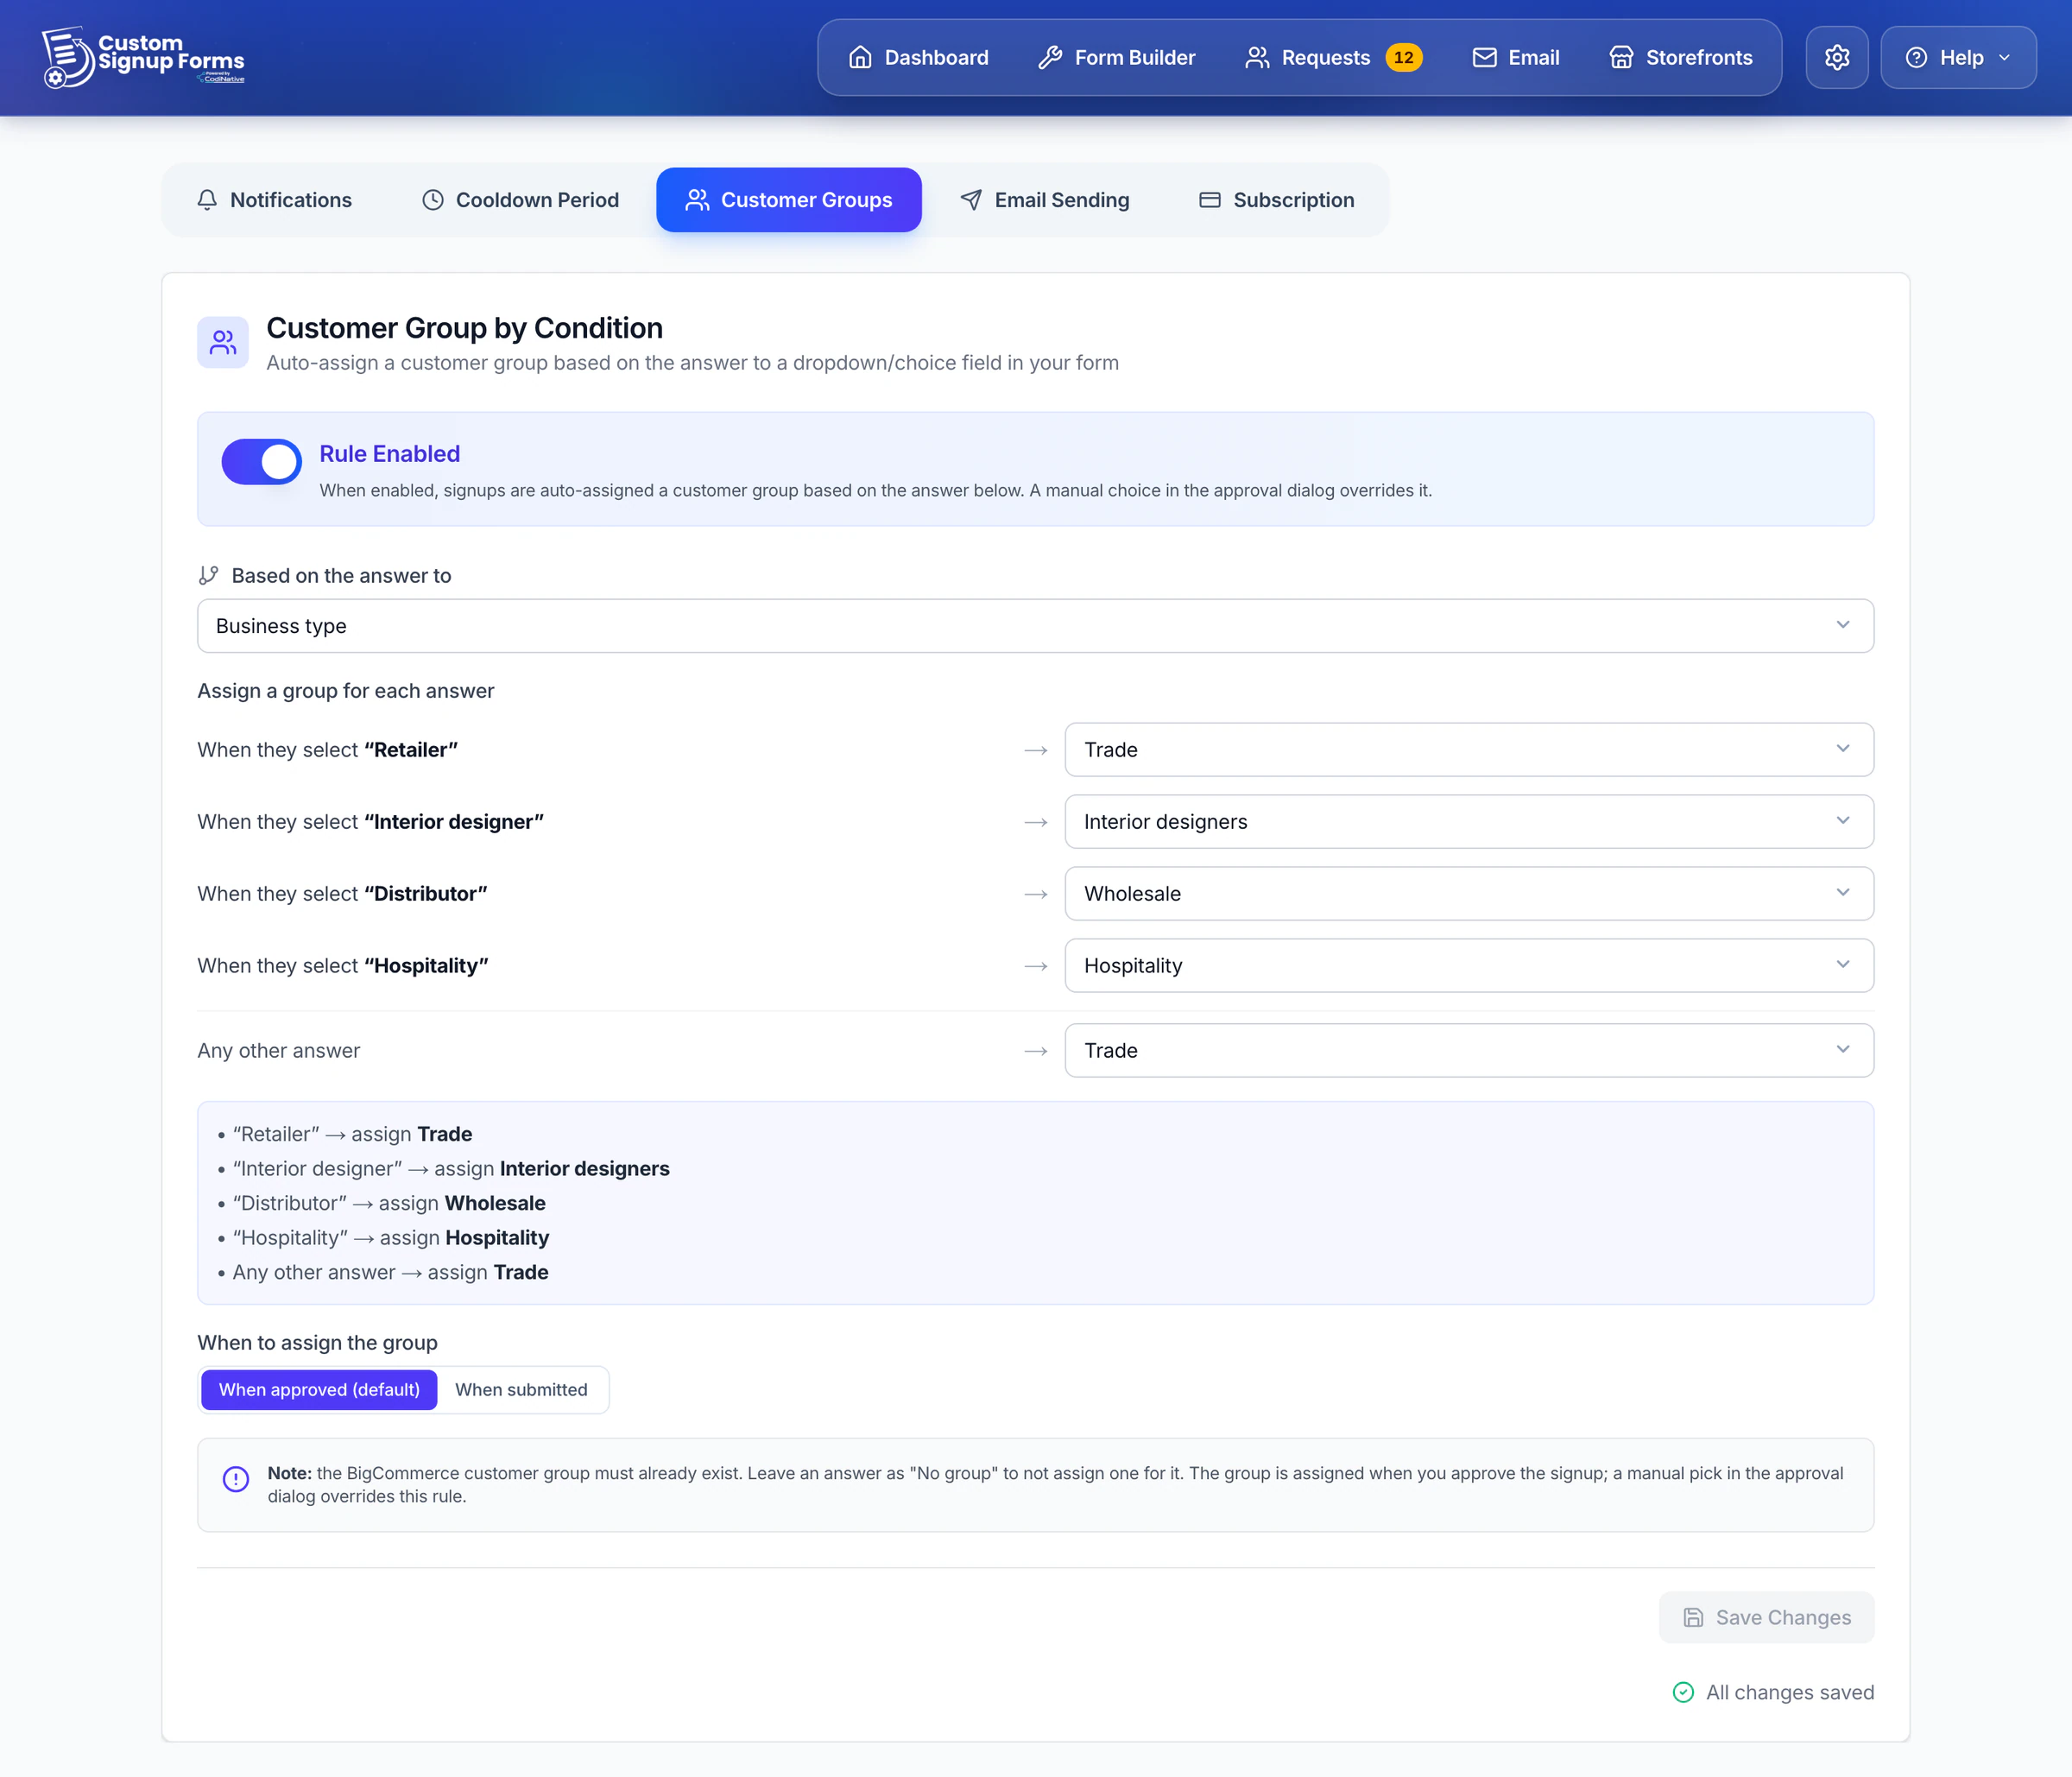
- Give a Dropdown, Single Choice or Multiple Choice field conditional logic in your live form.
- Switch on Rule Enabled and choose the field under Based on the answer to.
- Pick a BigCommerce customer group for each answer, and one for Any other answer.
- Choose When approved (the default) or When submitted, then click Save Changes.
The groups must already exist in BigCommerce. When submitted creates the customer account in that group as soon as the form is sent, while the request still waits for you. A group you pick in the Approve dialog always wins over the rule.
Subscription
Your plan, its price and renewal date, and this month's usage: storefronts, signups and saved forms. Use Upgrade or Change plan to switch plans, and Manage billing for invoices and your payment method. Upgrades apply straight away; downgrades at the end of the billing period. More in Plans and Billing.
Additional resources
- Installation Guide - install the app and put your first form live.
- Multi-storefront Guide - a different form and settings per storefront.
- Headless Storefronts - add the form to a headless storefront built with Catalyst, Next.js, Nuxt, React, Angular or any other web framework.
- Email and SMTP Setup - SMTP values for common email providers.
- Plans and Billing - what each plan includes, trials and changing plans.
- Questions? Email info@codinative.com.